


Oyster Mushroom Farming: Cost, Profit & Complete Guide
Most people who look into oyster mushroom farming get hooked by one number: a first harvest in around 20–25 days. That’s a real advantage over most crops, and it’s exactly why oyster mushrooms have become the entry point for thousands of small growers, home-based units, and side-income seekers across India.
But here’s the part nobody tells you in the first five minutes: the crop that grows fastest is also the crop that punishes carelessness fastest. Get your substrate wrong, or let contamination slip through, and you won’t find out in three months — you’ll find out in three days.
This guide walks through what actually determines whether an oyster mushroom farm makes money or quietly drains it — strain selection, spawn-run and fruiting conditions, humidity, contamination, cost per bag, and where you’ll actually sell what you grow.
Why Oyster Mushrooms Are a Smart Starting Point for Small Farmers
Oyster mushrooms (mainly Pleurotus ostreatus and Pleurotus florida) are forgiving compared to button or shiitake mushrooms. They tolerate a wider temperature range, don’t need expensive climate-controlled rooms in most parts of India, and grow well on cheap, locally available substrate like wheat straw or paddy straw.
That combination — low setup cost, short crop cycle, low technical barrier — is why oyster mushrooms are usually the first mushroom a new grower attempts. It’s not the most profitable mushroom per kilo. It’s the easiest one to learn the business on without losing your shirt.
Expert Tip: Don’t treat your first batch as a business. Treat it as a paid training exercise. A small trial batch of 20–30 bags teaches you more about your local climate and contamination risks than any article can.
Which Oyster Mushroom Strain Should You Grow?
This is where a lot of planning goes wrong before a grower has even bought spawn — and it’s also where the “just grow oyster mushrooms, they’re easy” advice oversimplifies things. India’s climate varies enormously, even within a single district, so a strain that fruits beautifully in one grower’s shed can sulk in another’s.
The bigger nuance most guides skip: spawn-run temperature and fruiting temperature are not the same thing. Mycelium running through the substrate tolerates a fairly wide range, but the fruiting stage — when mushrooms actually form — is far more particular, and it’s usually a few degrees cooler than spawn-run.
| Strain | Spawn-Run Temp | Fruiting Temp | Best Suited For |
|---|---|---|---|
| Pleurotus florida | 22–28°C | 20–25°C | Plains and moderate climates, most of the year |
| Pleurotus sajor-caju | 25–30°C | 25–30°C | Warmer, humid regions where florida struggles to fruit |
| Pleurotus ostreatus (grey oyster) | 20–25°C | 12–20°C | Hill regions, or winter cropping in the plains |
| Pink/Yellow oyster | 28–32°C | 25–30°C | Warmer climates; note that “up to 35°C” doesn’t mean sustained 35°C gives good commercial fruiting — quality drops well before that ceiling |
Treat these ranges as a starting reference, not a guarantee — spawn source, substrate, and even the specific sub-strain can shift them slightly. Commonly cited cultivation guidance for oyster mushroom in India generally works within a 20–30°C, 70–85% relative humidity band, with individual species and sub-strains sitting at different points within it. Treat these ranges as a general working guide rather than a fixed standard, because the ideal conditions vary by species, strain, spawn quality, and local climate. If you’re unsure, ask your spawn supplier for the exact temperature band they recommend for that batch — a good supplier should be able to tell you the incubation and fruiting temperature for the specific strain they’re selling.
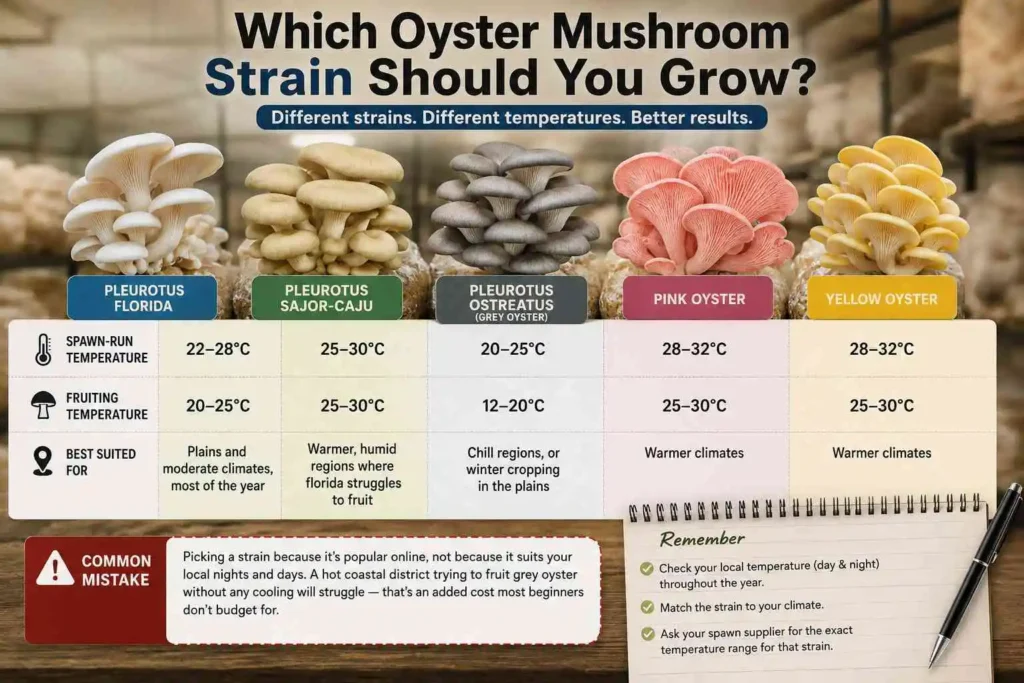
Common Mistake: Picking a strain because it’s popular online, not because it suits your local nights and days. A hot coastal district trying to fruit grey oyster without any cooling will struggle — that’s an added cost most beginners don’t budget for.
Managing Humidity and Ventilation — The Part Most Guides Skip
Temperature gets all the attention, but humidity and fresh-air exchange are just as often where a crop is won or lost, and beginners rarely get taught how to actually manage them day to day.
Humidity: Cultivation guidance commonly places good oyster mushroom growth in the 70–85% relative humidity range, with some growers pushing toward 85–90% during active fruiting. Treat this as a general working guide rather than a fixed standard, since the ideal figure shifts with strain and local climate. Too low, and developing pins dry out and abort before they mature. Too high — especially combined with poor airflow — and you create exactly the damp, stagnant conditions that bacteria and mould thrive in.
- Mist the growing area lightly, aiming at the walls and floor rather than directly on the bags, 2–3 times a day depending on your climate.
- Never let water pool inside bags or at their base — this is a direct route to bacterial soft rot.
- A simple hygrometer (₹200–₹400) removes the guesswork; “the air feels humid enough” is not a reliable method.
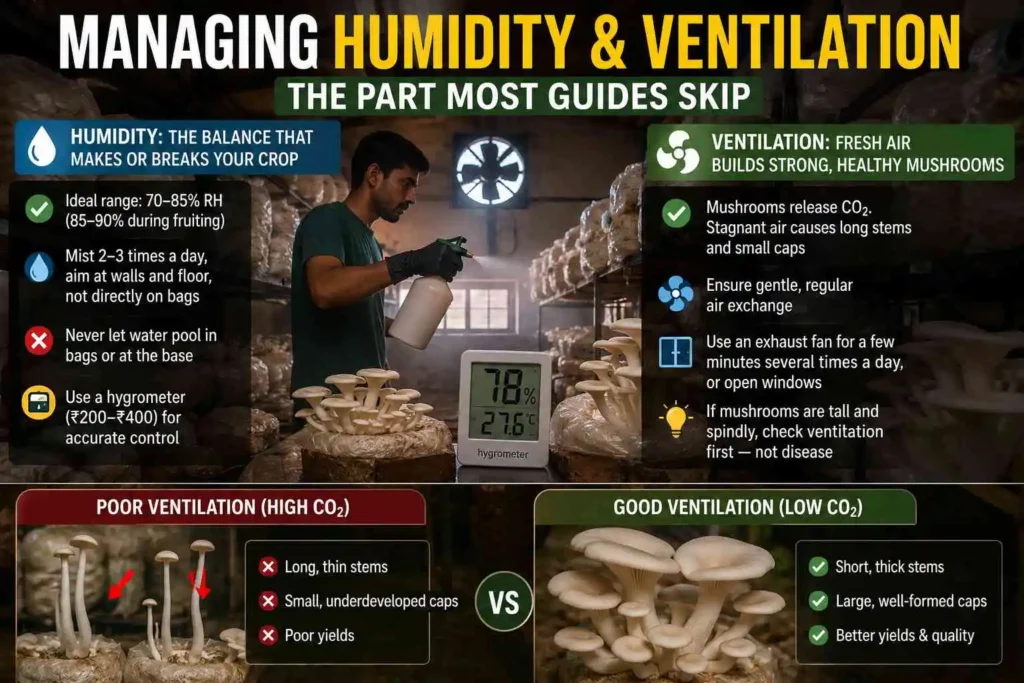
Ventilation: Mushrooms release CO₂ as they grow, and a sealed, stagnant room lets it build up. High CO₂ causes long, thin stems with small, underdeveloped caps — a classic sign growers often mistake for a disease problem when it’s actually an airflow problem.
- Fresh air exchange doesn’t mean a strong draft — a gentle, regular air change (a small exhaust fan run for a few minutes several times a day, or simply opening a window periodically) is usually enough.
- If your mushrooms are growing tall and spindly with tiny caps, check ventilation before you check anything else.
Which Substrate Gives the Best Oyster Mushroom Yield?
Substrate is where most of your recurring cost sits, and also where most contamination problems start. Wheat straw and paddy straw are the most common choices in India because they’re cheap and widely available, but availability alone shouldn’t decide your substrate.
| Substrate | Approx. Cost (per 100 kg, India) | Yield Potential | Contamination Risk |
|---|---|---|---|
| Wheat straw | ₹400–₹600 | High, consistent | Moderate if not pasteurized properly |
| Paddy straw | ₹300–₹500 | Moderate | Higher — needs careful drying |
| Sugarcane bagasse | ₹200–₹400 | Moderate | Moderate |
| Cotton waste | ₹500–₹800 | High | Lower if handled hygienically |
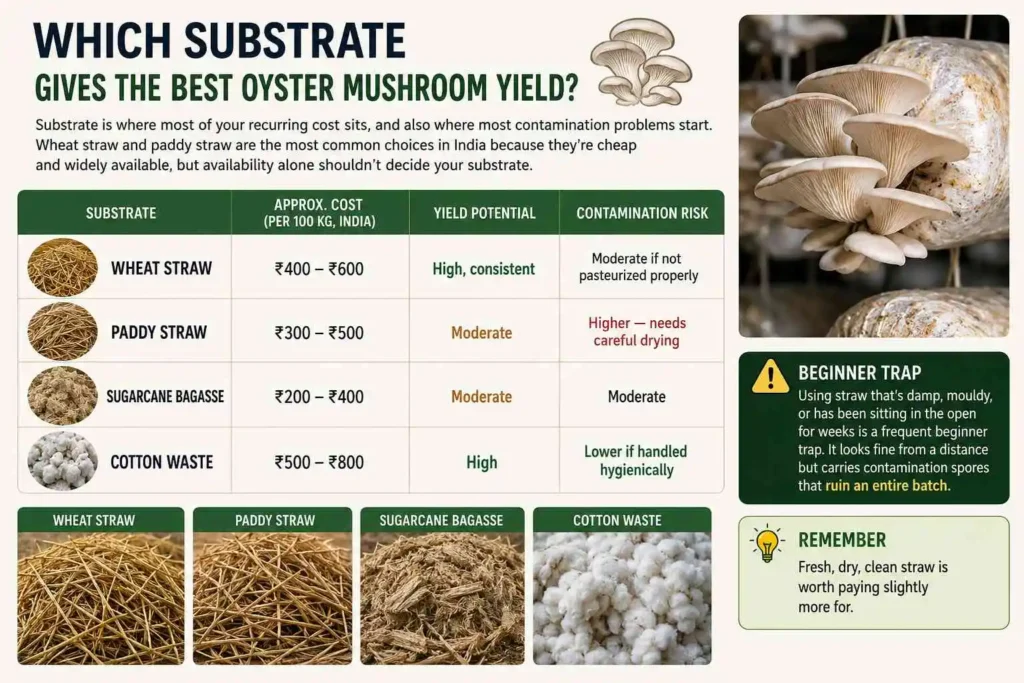
Using straw that’s damp, mouldy, or has been sitting in the open for weeks is a frequent beginner trap. It looks fine from a distance but carries contamination spores that ruin an entire batch. Fresh, dry, clean straw is worth paying slightly more for.
Getting the Basics Right: Pasteurization and Bag Preparation
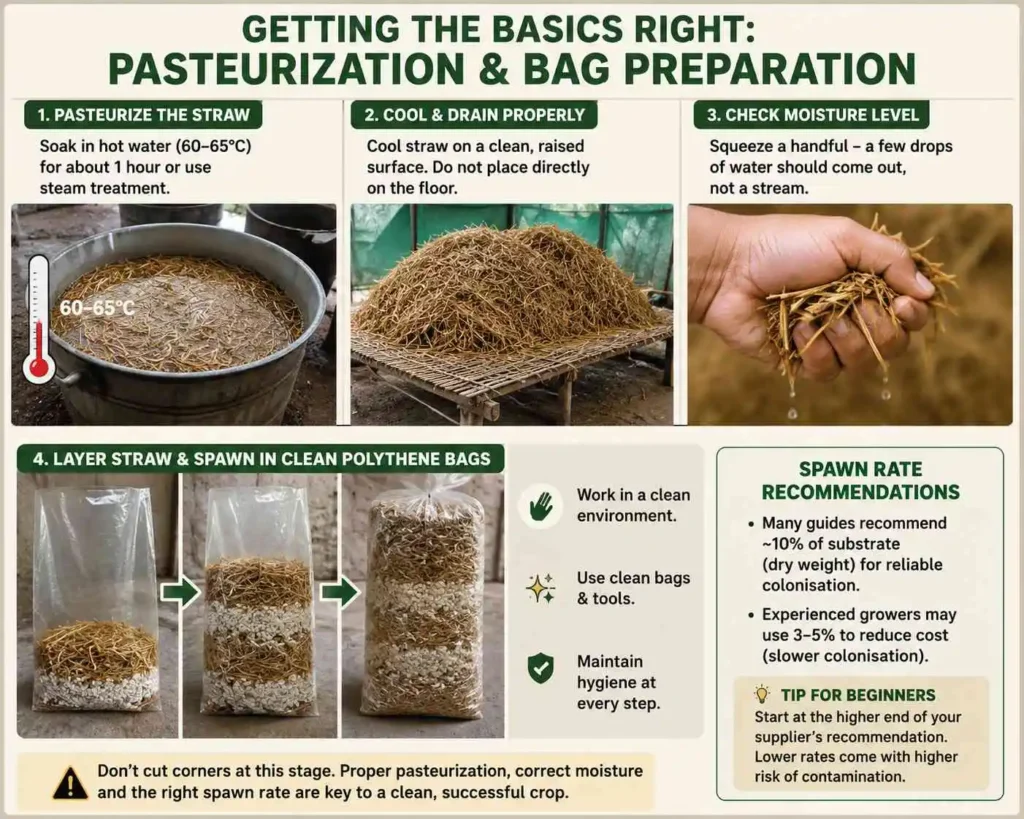
Pasteurizing your substrate — usually by soaking in hot water (60–65°C) for about an hour, or steam treatment — reduces competing fungi and bacteria without destroying the straw’s structure. Doing this step half-heartedly is one of the more common causes of contaminated bags among new growers, though it’s rarely the only factor at play.
After pasteurization, straw needs to be cooled and drained to the right moisture level before spawning — too wet invites bacterial contamination; too dry slows mycelium growth.
Practical steps:
- Pasteurize straw fully — don’t cut the soaking time short to save fuel.
- Cool straw on a clean, raised surface, not directly on the floor.
- Check moisture by squeezing a handful — a few drops of water should come out, not a stream.
- Layer straw and spawn in clean polythene bags. Published spawn rate recommendations vary — some cultivation guides suggest around 10% of substrate dry weight for reliable colonisation, while other commercial growers report using lower rates, closer to 3–5%, to cut costs once they’ve built confidence in their process. Part of the difference comes down to how “spawn rate” is measured (dry weight vs. wet weight of substrate) and how experienced the grower is at keeping contamination low at a lower rate — a lower spawn rate generally means slower colonisation and a longer window where contaminants can get a foothold. If you’re new to this, start at the higher end your supplier recommends rather than cutting the rate down on your own first attempt.
Why Contamination Is a Problem You Have to Manage, Not Just Hope Avoids You
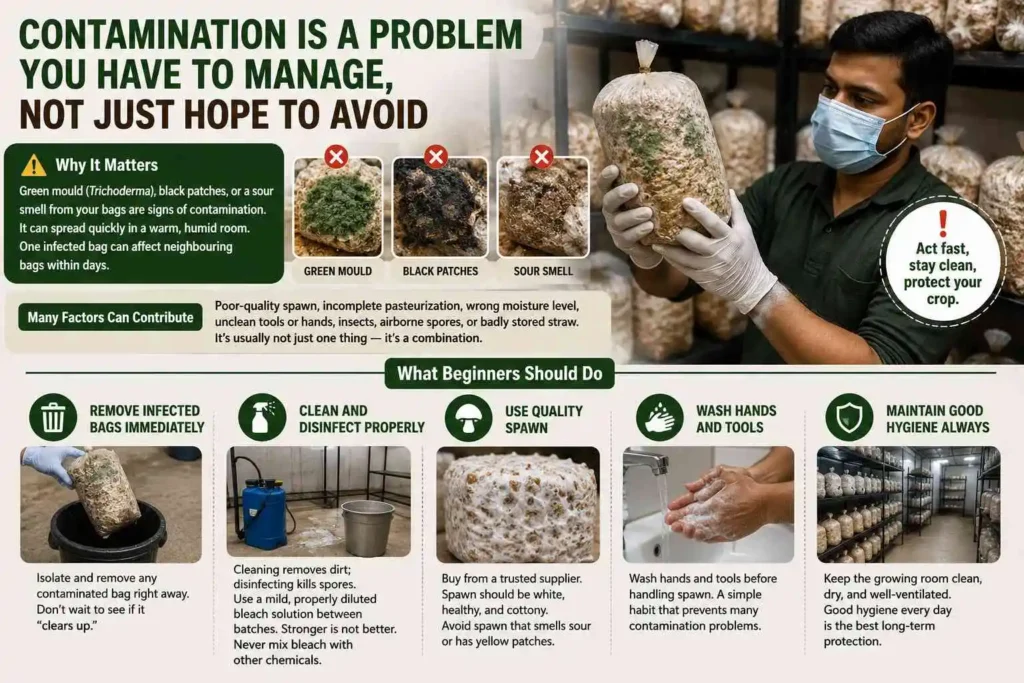
Green mould (Trichoderma), black patches, or a sour smell from your bags are common signs of contamination — and they can spread quickly in a warm, humid growing room. A single infected bag left untreated can affect neighbouring bags within days.
It’s tempting to say contamination always comes down to one or two habits, but that oversimplifies it. In practice, several things can contribute: poor-quality or old spawn, incomplete pasteurization, substrate that’s too wet or too dry, unclean tools and hands, insects carrying spores, airborne contamination in a dusty room, or straw that wasn’t stored properly before use.
What beginners should actually do:
- Isolate and remove any contaminated bag immediately — don’t wait to see if it “clears up.”
- Distinguish between cleaning (removing visible dirt) and disinfecting (killing spores and pathogens) — a floor can look clean and still be contaminated. Between batches, disinfect racks and floors with a mild, properly diluted bleach solution (follow the label’s dilution ratio — stronger isn’t better), and never mix bleach with other cleaning chemicals.
- Source spawn from a supplier with a reliable track record, and check it for a healthy white, cottony appearance before use — avoid spawn that smells sour or shows yellow patches.
- Wash hands and tools before handling spawn — a simple habit that prevents a meaningful share of contamination cases, even if it isn’t the only safeguard you need.
How to Know When Your Mushrooms Are Ready to Harvest
Oyster mushrooms are ready when the caps start to flatten and the edges just begin to curl upward — not fully flat, and definitely not before the caps have properly opened. Harvesting too early gives smaller yield; harvesting too late gives tougher, less marketable mushrooms.
Most growers twist and pull the whole cluster gently at the base rather than cutting, since it tends to leave less stub tissue behind to rot. That said, commercial practice varies, and cutting cleanly with a sharp, clean knife works fine too — the real priority is removing the cluster fully and avoiding decaying tissue left in the bag, whichever method gets you there.
A first flush typically appears 20–25 days after spawning under suitable conditions. That’s not the end of the crop, though — most bags go on to give 3–4 flushes in total, with production continuing for roughly 45–60 days depending on strain, substrate, and how well the bags are managed. The first flush is usually the heaviest, with each subsequent flush giving progressively less.
What Does It Actually Cost to Produce One Bag?
Before looking at any large-scale numbers, it helps to know your cost per bag — this is the number that lets you judge whether a batch is worth doing at all, regardless of scale.
| Cost Head (per bag, approx.) | Cost (₹) |
|---|---|
| Straw (dry weight, roughly 1.5–2 kg per bag) | ₹8–₹12 |
| Spawn (rate varies by source and practice — commonly 10% of substrate dry weight, sometimes lower; see note below) | ₹10–₹15 |
| Polythene bag | ₹2–₹3 |
| Fuel/electricity (pasteurization, misting) | ₹3–₹5 |
| Labour (shared across batch) | ₹5–₹8 |
| Miscellaneous & sanitation (disinfectant, minor repairs, wastage) | ₹4–₹5 |
| Approx. total cost per bag | ₹32–₹48 |
For planning purposes, a biological efficiency of roughly 60–80% can be used as an illustrative range — this figure represents the fresh mushroom weight produced as a percentage of the dry substrate weight, across all flushes combined. As one documented example: a technology demonstration by ICAR-RCER’s Farming System Research Centre in Ranchi, Jharkhand (source), reported farmer groups achieving biological efficiency between 76.4% and 85.3%, selling their produce locally at ₹120–₹150 per kg. That’s a strong outcome under a supported, well-managed demonstration project — actual results on any given farm can run lower, especially in a beginner’s first few cycles, depending on strain, substrate preparation, spawn quality, and day-to-day management.
Using the lower, more conservative end for planning: a bag with 1.5–2 kg dry straw might yield roughly 900 g–1.6 kg of fresh mushrooms over its full cropping period. At a local selling price of ₹80–₹150/kg, that’s approximate gross revenue of ₹70–₹240 per bag — against a cost of ₹32–₹48. Treat this as a planning range, not a guaranteed outcome — it assumes every bag stays healthy and every kilo gets sold at that price, which brings us to the next point.
Warning: Gross revenue is not profit. It doesn’t yet account for failed or contaminated bags, unsold or spoiled stock, transport, packaging, and any equipment depreciation. Build these into your own numbers before deciding a batch “worked.”
Oyster Mushroom Farming Cost for 100 Bags: A Realistic Starting Benchmark
Jumping straight to 500 bags is a common overreach. A 100-bag batch is a far better benchmark for someone testing their process, local climate, and buyer network before committing serious money.
| Cost Head | Approx. Cost (₹) |
|---|---|
| Spawn (100 bags) | ₹1,000–₹1,500 |
| Substrate (straw + pasteurization, ~150–200 kg) | ₹800–₹1,200 |
| Polythene bags | ₹200–₹300 |
| Fuel/electricity | ₹300–₹500 |
| Labour (own time or hired) | ₹500–₹800 |
| Miscellaneous & sanitation | ₹400–₹500 |
| Total cost, 100 bags | ₹3,200–₹4,800 |
| Expected fresh yield (approx., using a conservative biological efficiency planning range) | 90–160 kg over the full cropping period |
| Local selling price (per kg) | ₹80–₹150 |
| Approx. gross revenue | ₹7,200–₹24,000 |
This 100-bag total lines up with the per-bag figures above (₹32–₹48 × 100 bags ≈ ₹3,200–₹4,800), and assumes the growing space itself is already available (a spare room or shed). It doesn’t include rent or construction cost, electricity connection charges, or a hygrometer/thermometer, which are one-time or largely fixed costs. It also doesn’t account for bags lost to contamination or mushrooms that go unsold — both of which reduce the real number, sometimes significantly in a first attempt.
Once you’ve run 2–3 cycles at 100 bags with manageable contamination losses and a buyer who reliably takes your stock, scaling to 300 or 500 bags becomes a much safer decision — the same cost logic simply multiplies, but now you’re multiplying a process you’ve actually tested.
Basic Equipment Needed for Oyster Mushroom Farming
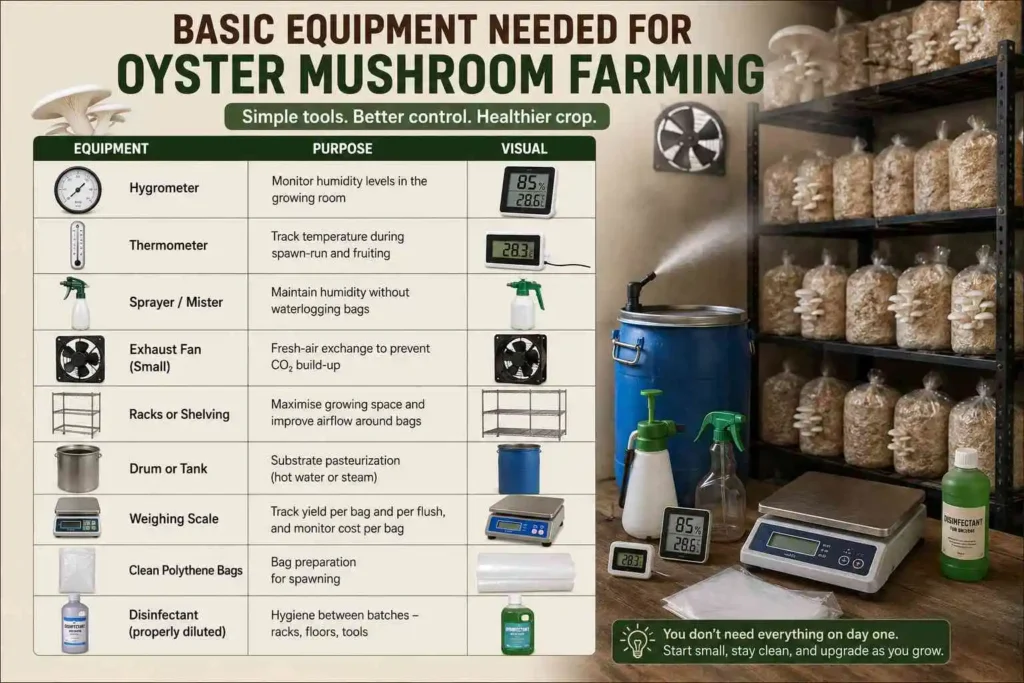
None of this requires expensive machinery, but a few basic tools make the difference between guessing and actually managing your crop.
| Equipment | Purpose |
|---|---|
| Hygrometer | Monitor humidity levels in the growing room |
| Thermometer | Track temperature during spawn-run and fruiting |
| Sprayer/mister | Maintain humidity without waterlogging bags |
| Exhaust fan (small) | Fresh-air exchange to prevent CO₂ build-up |
| Racks or shelving | Maximise growing space and improve airflow around bags |
| Drum or tank | Substrate pasteurization (hot water or steam) |
| Weighing scale | Track yield per bag and per flush, and monitor cost per bag |
| Clean polythene bags | Bag preparation for spawning |
| Disinfectant (properly diluted) | Hygiene between batches — racks, floors, tools |
Most of these are one-time or low-cost purchases, and a small first batch doesn’t need all of them from day one. A thermometer, hygrometer, and sprayer are worth having even for a 20–30 bag trial, since they’re what let you actually diagnose problems instead of guessing at them.
Where Should You Sell Oyster Mushrooms for the Best Price?
Local wet markets typically pay the least. Direct sales to households, small hotels, and restaurants usually fetch better prices. In cities with awareness of mushroom nutrition, health-food stores and organic outlets can pay a premium, though volumes tend to be smaller and more inconsistent.
Value-added products — dried mushrooms, mushroom pickle, mushroom powder — are worth exploring once you’ve stabilized fresh production, since they extend shelf life and open a different customer base entirely.
Your First Oyster Mushroom Farming Roadmap
If you’re starting from zero, it helps to have an actual sequence rather than a list of facts to absorb. Here’s a realistic first-timer’s path:
- Check your local climate — note your typical day/night temperatures across the year before picking anything.
- Choose the right strain for those temperatures, checking both spawn-run and fruiting ranges with your supplier.
- Start with 20–50 bags, not more, for your very first attempt.
- Source reliable spawn — healthy, white, cottony, from a supplier you can vouch for.
- Prepare and pasteurize substrate properly — don’t shortcut the soak time.
- Inoculate and incubate the bags in a dark, moderate-temperature space until fully colonised.
- Move bags to fruiting conditions — correct temperature, 70–85% humidity (pushing toward 85–90% during active fruiting if needed), and gentle ventilation.
- Harvest at the right stage — caps flattened, edges just curling.
- Sell immediately — line up at least one buyer before your first harvest arrives, since shelf life is short.
- Track your numbers — yield per bag, contamination rate, actual cost per bag — for every cycle.
- Scale only after 2–3 successful cycles, once your process and buyer relationships are proven.
If you’re serious about starting, the smartest first move isn’t buying equipment for 500 bags — it’s running a 20–50 bag trial, tracking your actual cost per bag and your local temperature and humidity patterns, and finding out exactly how your substrate and climate behave together. Before scaling up, it’s also worth understanding the basics of [mushroom farming], including setup costs, growing methods, and the factors that affect profitability. Get that right on a small scale, and scaling up becomes a much safer decision.
Frequently Asked Questions
How long does it take to start earning from oyster mushroom farming?
A first flush typically appears 20–25 days after spawning, with 3–4 flushes over the following 45–60 days. Actual income depends on how quickly you find buyers for your first batch and how many bags stay free of contamination.
Can oyster mushroom farming be done at home without a separate structure?
Yes, a spare room, unused space, or a simple shed with good ventilation and shade works for small-scale growing. What matters more than the structure is controlling temperature, humidity, and fresh-air exchange — not the building itself.
What is the biggest reason oyster mushroom farms fail?
There’s rarely a single cause. Poor pasteurization, substandard spawn, weak ventilation, and not having a buyer ready before harvest all show up repeatedly among new growers — usually in combination rather than isolation.
Do oyster mushrooms need sunlight to grow?
No direct sunlight is needed — direct sun can dry out and damage the bags. Oyster mushrooms need some diffused light to trigger proper fruiting, which is why a shaded, ventilated space works better than a completely dark room.
For most first-time growers, oyster mushrooms are the easier starting point. They tolerate a wider temperature range, need simpler infrastructure, and use cheaper, more widely available substrate than button mushrooms, which usually need compost and more controlled conditions.
Newsletter