


How to Grow Chillies at Home: A Beginner’s Guide
A single chilli plant in a bucket-sized pot can keep a kitchen supplied with fresh green chillies for months. Yet many first-time growers end up with a leafy plant, dropped flowers and almost no fruit, then assume chillies are “difficult.”
They usually aren’t. Most problems come from a handful of fixable mistakes: too little sun, too much water, the wrong pot or too much fertiliser.
This guide follows the real journey of a chilli plant, from choosing a variety to picking your first harvest. You’ll learn how to choose a variety for home growing, whether to start with seeds or nursery seedlings, which pot and soil mix work best, how much sunlight and water chilli plants need, how to feed them, what to do when flowers fall off, and how to deal with pests and disease.
How to Grow Chillies Successfully in a Small Space?
Yes. Chillies are among the most container-friendly vegetables you can grow. They have a compact root system compared with crops like tomatoes or brinjal, and many varieties stay a manageable height. That makes them well suited to balconies, terraces, rooftops and sunny windowsills.
What matters is not how much space you have, but what that space offers. A small balcony with five or six hours of direct sun will beat a large, shady garden every time. Chillies also like warmth, so they tend to do well in most Indian home-growing conditions, as long as the plant isn’t exposed to frost or waterlogged soil.
A healthy chilli plant in a pot should show steady new growth at the tips, deep green leaves, and flower buds forming once the plant is established. Expect one plant to occupy roughly the footprint of its pot, plus some spread of branches, so even a few pots fit on a narrow balcony ledge.
Key Takeaway: Sunlight, warmth and drainage matter more than space. If your balcony gets several hours of direct sun, you can grow chillies.
Which Chilli Variety Should You Grow at Home?
Walk into a nursery and you’ll see packets labelled green chilli, hot chilli, bird’s eye, cluster chilli and more. Choosing well at this stage saves a lot of frustration later.
For beginners, the best variety is usually one that is locally adapted and easy to find as seeds or seedlings. Varieties that thrive in a Hyderabad terrace may not behave the same way in a Himachal winter. Ask your local nursery or a nearby Krishi Vigyan Kendra which types perform well in your area.
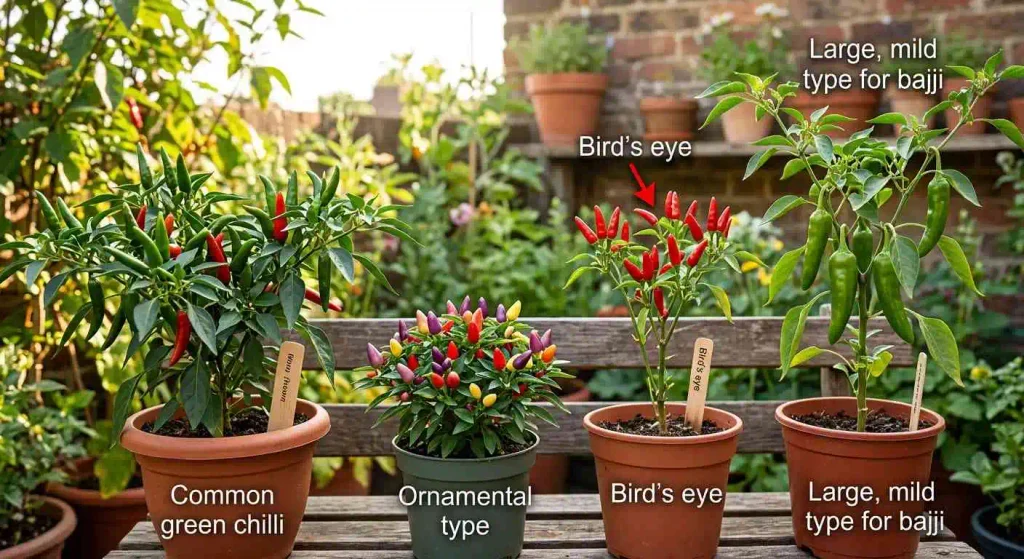
The table below compares the main options home growers choose between, so you can match a type to your space and taste.
| Type | Typical plant size | Heat level | Suitability for pots |
|---|---|---|---|
| Common green chilli (the everyday kitchen type) | Medium, bushy | Mild to hot, depending on variety | Very good |
| Bird’s eye / small, very pungent types | Often compact to medium, many small fruits | Usually very hot | Good, and attractive on balconies |
| Compact or dwarf ornamental-type varieties | Small | Varies widely | Excellent for windowsills |
| Large, mild types (for stuffing or bajji) | Medium to tall | Mild | Needs a larger pot and good support |
Heat level varies even within a named variety, depending on growing conditions and seed source, so treat the table as a general guide. Avoid buying based on promised yields; results depend on your light, soil, climate and care.
Should You Start with Seeds or Nursery Seedlings?
Both routes work. The right choice depends on your patience, season and how much control you want.
Seeds give you more variety choices and cost less, but they demand more attention in the first weeks. Nursery seedlings save time and skip the most delicate stage, but you have less choice and must check plant health carefully before buying.
| Starting from seeds | Buying nursery seedlings | |
|---|---|---|
| Time to a transplant-ready plant | Several weeks | Already established |
| Cost | Low | Higher per plant |
| Variety choice | Wide | Limited to what’s available |
| Beginner difficulty | Moderate | Easier |
| Main risk | Weak, leggy or damaged seedlings | Buying plants with hidden pests or disease |
How to grow chilli plants from seeds
- Choose fresh, healthy seeds. Buy from a reputable seed seller, check the packing date, and avoid old, shrivelled seeds.
- Use a light, fine seed-starting mix. A mix of cocopeat and compost, or vermicompost, works well. Fill a tray or small pots with drainage holes.
- Sow shallow. Press seeds about 0.5 to 1 cm (roughly ¼ to ½ inch) deep and cover lightly. Burying them too deeply is a common reason for poor or uneven germination.
- Keep the mix evenly moist, never soggy. A fine spray bottle is better than pouring water, which can wash seeds around or compact the surface.
- Give warmth and light. Chilli seeds germinate best in warm conditions. Place the tray in a warm, bright spot, but out of harsh midday sun until seedlings emerge. Germination can take from about one to three weeks depending on temperature and seed freshness.
- Move to bright light as soon as seedlings appear. Seedlings that don’t get enough light stretch tall and thin, and stay weak.
- Transplant when seedlings have several true leaves. Handle them by the leaves, not the stem, and keep as much of the root ball intact as possible. Water gently afterwards.
Common Mistake: Overwatering seedlings. Constantly wet mix encourages damping-off, a fungal problem that makes seedlings collapse at the base. Water only when the surface starts to dry.
If you buy seedlings, choose sturdy plants with deep green leaves and no spots, curling or sticky residue. Flip a few leaves and check the undersides for tiny insects before bringing a plant home.
What Pot Size Gives Chilli Plants Enough Room to Grow?
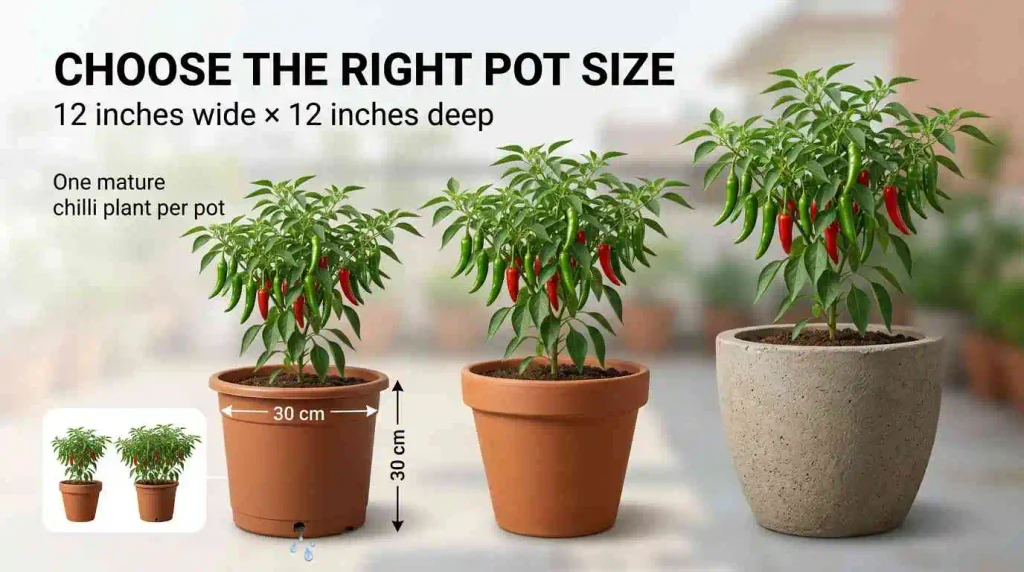
A good target for one mature chilli plant is a pot about 30 cm (12 inches) wide and at least 30 cm deep. Larger types may do better in 35 to 40 cm (14 to 16 inches). Seedlings can start in small pots or trays and move up in stages, which prevents the excess soil moisture that small roots can’t use.
Whatever you choose, drainage holes are non-negotiable. Water that can’t escape leads to rotting roots, which is one of the quickest ways to lose a chilli plant.
| Container | Pros | Watch out for |
|---|---|---|
| Plastic pots or grow bags | Light, cheap, hold moisture longer | Can heat up in strong sun; ensure good drainage |
| Terracotta / clay | Breathable, stable | Dries quickly in summer; heavy |
| Cement or large buckets (with holes drilled) | Cheap, roomy | Make sure holes are adequate |
Plant one chilli plant per pot. Crowding two or three plants into a small container creates competition for water, nutrients and light, and often reduces overall fruiting. Move a plant to a larger pot when roots start coming out of the drainage holes or growth slows even though you’re caring for it properly.
How to Prepare Soil That Supports Healthy Growth
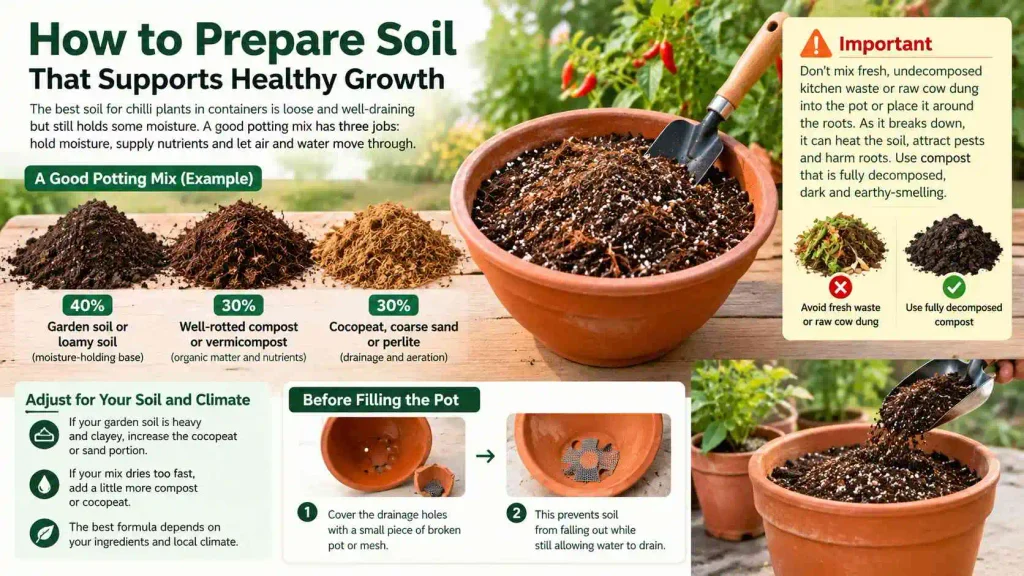
The best soil for chilli plants in containers is loose and well-draining but still holds some moisture. Heavy garden soil on its own compacts in pots and suffocates roots.
A good potting mix has three jobs: hold moisture, supply nutrients and let air and water move through. Here is one practical example you can adjust to what’s available:
- 40% garden soil or loamy soil (the moisture-holding base)
- 30% well-rotted compost or vermicompost (organic matter and nutrients)
- 30% cocopeat, coarse sand or perlite (drainage and aeration)
If your garden soil is heavy and clayey, increase the cocopeat or sand portion. If your mix dries too fast, add a little more compost or cocopeat. The best formula depends on your ingredients and local climate.
Warning: Don’t mix fresh, undecomposed kitchen waste or raw cow dung into the pot or place it around the roots. As it breaks down, it can heat the soil, attract pests and harm roots. Use compost that is fully decomposed, dark and earthy-smelling.
Before filling the pot, cover the drainage holes with a small piece of broken pot or mesh so soil doesn’t wash out. Fill the pot, leaving a couple of centimetres of space at the top so water doesn’t overflow.
How Much Sunlight Does a Chilli Plant Really Need?
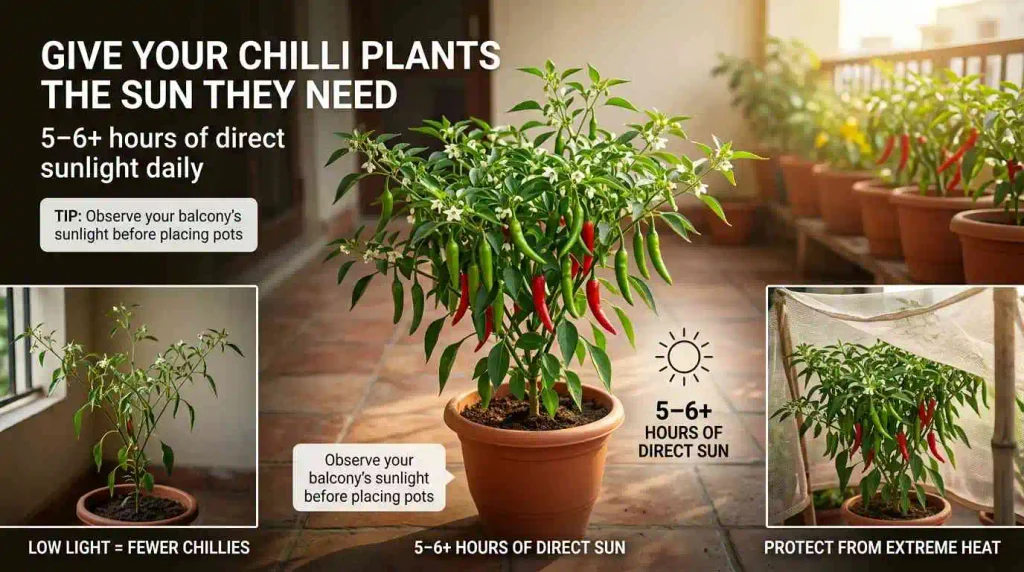
Bright shade isn’t the same as direct sun. A spot that feels bright to you may still deliver far less light than a plant needs for fruiting.
As a general rule, the sunlight requirements for chilli plants are about five to six hours or more of direct sun a day. Plants can survive on less, but they tend to grow leggy, flower poorly and give fewer chillies. Orient your pots toward the sunniest side of your balcony or terrace.
Young plants raised indoors or in shade need acclimatising. Over about a week, move them to the sun for a short period each day, increasing exposure gradually. Putting a tender seedling straight into strong midday sun can scorch the leaves.
During extreme summer heat, particularly in north and central India, midday sun can stress plants. A light shade net or moving pots to a spot that gets morning sun and some afternoon shade can help during the hottest weeks.
Signs of insufficient light include stretched, thin stems, pale leaves and few or no flower buds. These symptoms can have other causes too, such as poor nutrition or overwatering, so check light first, then look at other factors.
Practical Tip: Observe your balcony on a sunny day and note when sunlight reaches each spot. Placing pots by guesswork is a common reason for weak plants.
How Often Should You Water Chilli Plants?
There’s no universal answer to how often to water chilli plants, and a fixed daily schedule is a classic beginner trap. How quickly the pot dries depends on pot size and material, weather, sun exposure, the age of the plant and your soil mix.
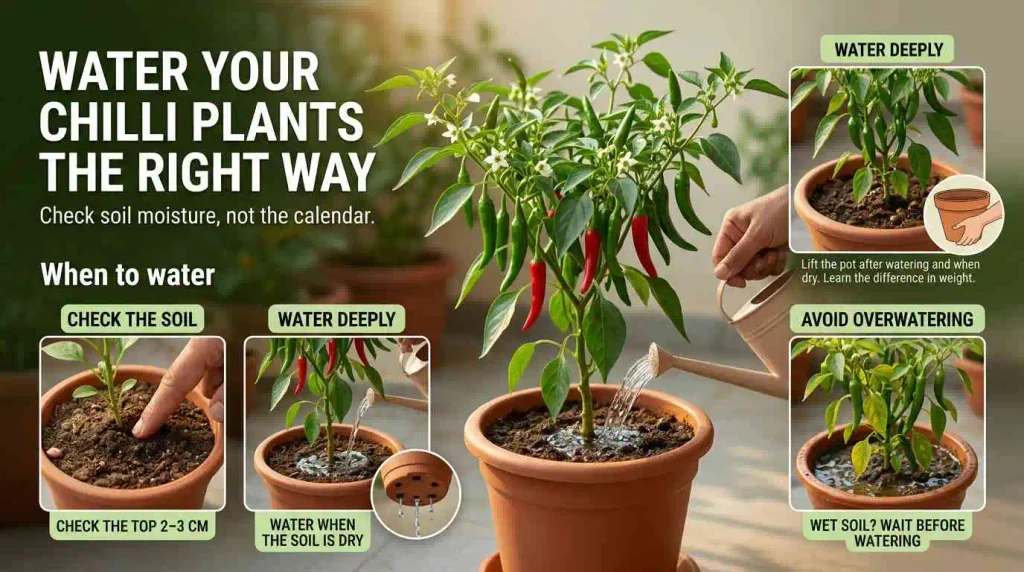
The easiest way to check is with your finger. Push it about 2 to 3 cm (around an inch) into the soil. If it feels dry at that depth, water thoroughly until water drains from the bottom. If it still feels damp, wait.
A simple routine for beginners:
- Check the soil every morning.
- Water deeply when the top few centimetres are dry, rather than giving small sips every day.
- In hot weather, you may need to water daily or nearly so, especially in small or terracotta pots. In cooler or humid weather, the interval can stretch considerably.
- Avoid evening watering that leaves foliage wet overnight, since this can encourage fungal problems.
Underwatering shows up as wilting, dry soil pulling away from the pot edge and crispy leaf edges. Overwatering often looks similar at first, with wilting, because damaged roots can’t take up water. The clue is soil that stays wet, leaves that yellow and a plant that doesn’t recover after watering. In that case, stop watering, improve drainage and allow the mix to dry somewhat before watering again.
Expert Tip: Lift the pot after watering and again when it’s dry. Learning how heavy it feels in each state is one of the most reliable ways to judge watering needs.
Which Fertiliser Helps Chilli Plants Produce More Chillies?
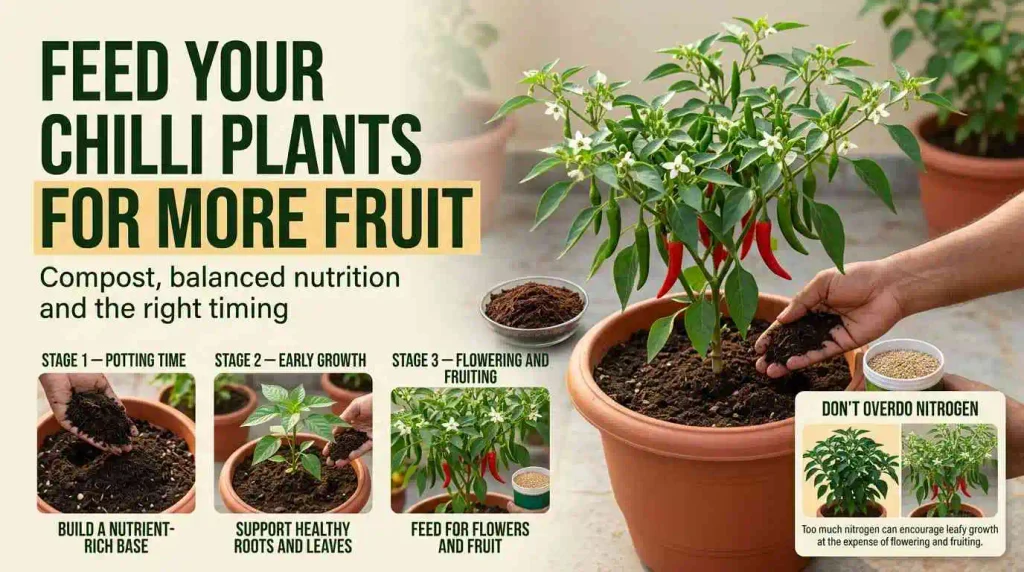
Nutrient needs change over the plant’s life. Young seedlings need gentle feeding to build roots and leaves. Once the plant starts flowering and fruiting, it needs a more balanced supply, including potassium and phosphorus, not just nitrogen.
A sensible approach for home growers:
- At potting time, mix in compost or vermicompost, which provides slow-release nutrients.
- During early growth, if the plant looks healthy, you may not need much beyond what’s in the mix. Add compost as a top-dressing now and then.
- From flowering onwards, use a balanced fertiliser or one formulated for flowering and fruiting vegetables, following the product label directions for quantity and frequency.
Too much nitrogen is a common trap. It pushes lush, dark green leaves at the expense of flowers and fruits. More fertiliser doesn’t mean more chillies, and over-application can burn roots and stress the plant. Before adding more, ask whether light, water and root health are in order.
Don’t apply fertiliser to a plant that’s wilting from dry soil or visibly stressed. Water first, let the plant recover, then feed.
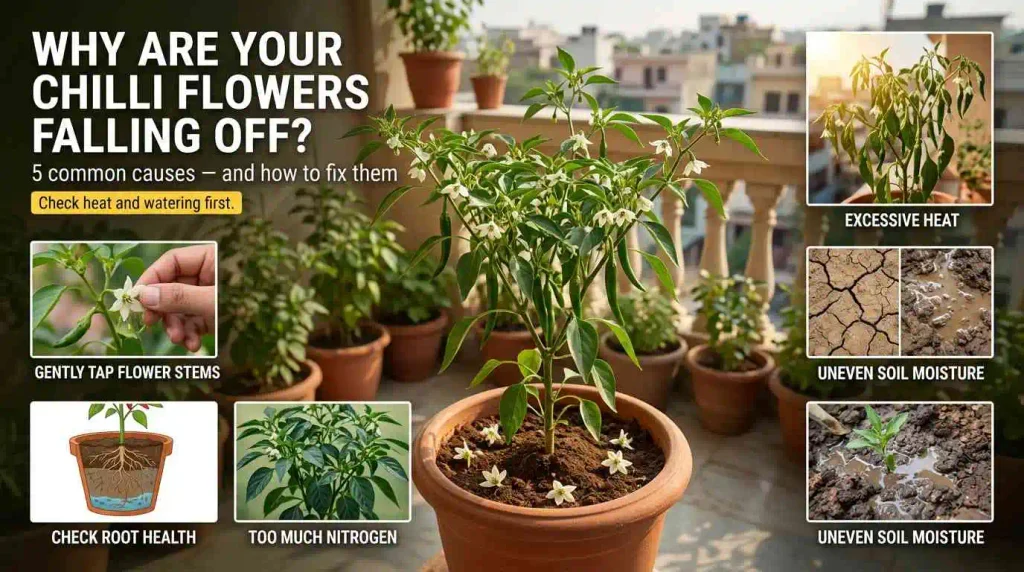
Why Are Your Chilli Plant’s Flowers Falling Off?
This is one of the most frustrating problems for new growers. You see lots of flowers, and then they drop without forming fruit. Chilli plant flowers falling off is common, and it rarely has a single cause.
Work through the likely culprits in order before reaching for fertiliser or spray:
- Heat stress. Very hot spells can cause flowers to drop. Provide light afternoon shade and consistent moisture during heatwaves.
- Irregular watering. Swinging between bone-dry and soggy soil stresses the plant. Aim for steady moisture.
- Nutrition imbalance. Too much nitrogen can reduce flowering. Too little of everything can weaken the plant.
- Poor plant health or root problems. A stressed plant sheds flowers to protect itself.
- Limited pollination. Chillies are largely self-pollinating, but on a closed balcony or in still air, gently shaking the plant or tapping the flower stems can help.
Fix what you can control, such as light, watering consistency and feeding, then be patient. Some flower drop is normal, especially early in the season. Constantly changing routines can do more harm than good.
How to Protect Chilli Plants from Pests and Diseases
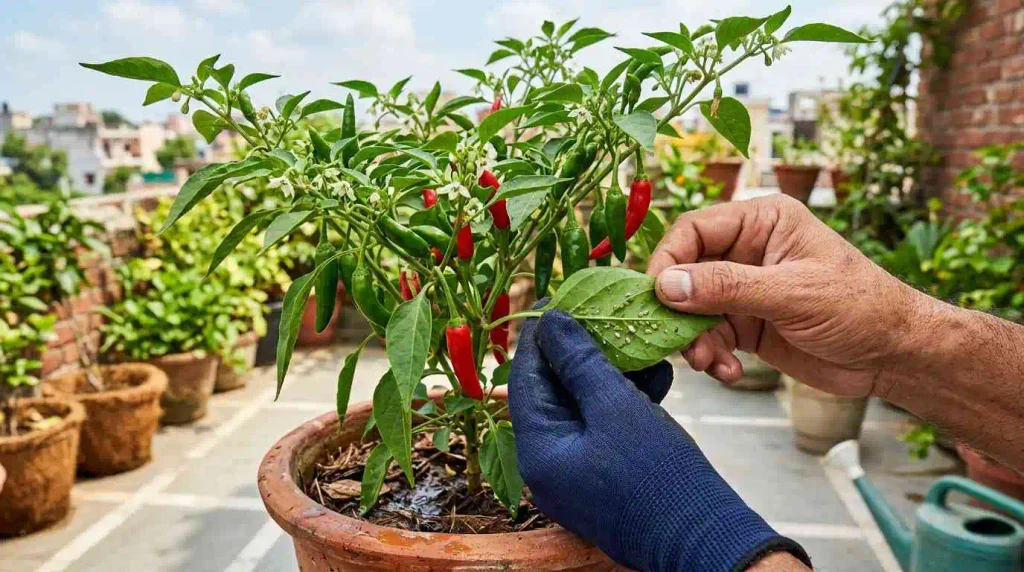
Healthy plants resist problems better, but pests still turn up. The usual suspects are aphids, whiteflies, spider mites and, in humid weather, fungal diseases such as leaf spots and powdery growth.
Make a habit of looking under the leaves, where many pests hide. Early signs include curling or distorted new leaves, sticky residue, tiny moving insects, fine webbing, speckled leaves or spots.
Start with low-risk measures:
- Remove heavily affected leaves or shoots and dispose of them away from your plants.
- Wash off aphids or mites with a gentle stream of water.
- Improve airflow by spacing pots and avoiding overcrowding.
- Avoid keeping soil constantly wet, and avoid wetting foliage late in the day.
- Isolate a newly bought plant for a week or so before placing it among your others.
If the problem is serious and these measures aren’t working, use a pesticide only if it is legally labelled for the crop, the pest and the setting, and follow all label instructions, including the interval between spraying and harvest. Identify the problem first. Spraying blindly can harm beneficial insects and the plant itself.
Homemade sprays are not guaranteed to be safe or effective. Some can burn leaves, especially in strong sun, so test on a small area first if you choose to try one.
Common Mistake: Treating every yellow leaf as a pest or nutrient problem. Yellowing can come from overwatering, root stress, low light, natural ageing of lower leaves or nutrient issues.
How Long Does It Take to Harvest Your First Chillies?
Timelines vary with variety, temperature, light and whether you start from seeds or seedlings. As a rough, qualified guide:
- Germination: often one to three weeks in warm conditions.
- Transplant establishment: typically a couple of weeks for roots to settle.
- Flowering: commonly some weeks after transplanting once the plant is established.
- First harvest: often a couple of months or more after transplanting for many common types, sometimes longer in cooler weather.
If you start with nursery seedlings, you can save weeks of the early stage.
Green chillies are ready when they reach a good size for the variety, feel firm and have glossy skin. For ripe chillies, leave some fruits on the plant until they change to their mature colour, commonly red, though some varieties ripen to other shades.
Pick with care. Hold the branch with one hand and snap or snip the stalk with the other, or use clean scissors. Pulling hard can tear branches. Regular picking encourages many varieties to keep producing, though how long a plant keeps going depends on variety, season and conditions.
Did You Know? Chilli plants are perennial in warm climates, so a plant that stays healthy can fruit for more than one season when protected from cold and cared for well.
Common Mistakes That Stop Chilli Plants from Producing Well
| Mistake | Likely effect | Straightforward fix |
|---|---|---|
| Pot without drainage holes | Waterlogged roots, rot | Use pots with holes or drill them |
| Keeping soil continuously wet | Yellowing, root problems, fungus | Water only when the top few centimetres are dry |
| Growing in inadequate light | Leggy growth, poor flowering | Move to a spot with five to six hours of direct sun |
| Too much nitrogen fertiliser | Lush leaves, few flowers | Switch to balanced feeding, follow label directions |
| Crowding plants in one small pot | Competition, weak growth | One plant per pot of suitable size |
| Moving seedlings suddenly into harsh sun | Leaf scorch, stress | Acclimatise gradually over about a week |
| Treating every yellow leaf as a nutrient deficiency | Unnecessary feeding, worsened problems | Check water, light and roots first |
| Spraying before identifying the problem | Wasted effort, possible plant damage | Inspect leaves closely and identify the cause first |
Seasonal Considerations in India
India’s climate varies widely, so there’s no single planting calendar. In much of north India, many growers sow in late winter to early spring for summer fruiting, and protect plants from frost and cold snaps. In hot, dry regions, shade and steady watering matter during peak summer. During the monsoon, humidity raises the risk of fungal problems, so airflow and drainage become even more important, and rain-drenched pots may need to be moved under cover. In warmer southern and coastal regions, growth can continue through much of the year, though extreme heat and heavy rain still need managing. Check what local nurseries and extension services recommend for your area and season.
A Simple Chilli Plant Care Routine for Beginners
This routine suits a busy schedule and keeps chilli plant care manageable.
Daily (two minutes)
- Check soil moisture with your finger and water if needed.
- Glance at the plant for wilting, new flowers or obvious changes.
Weekly (ten minutes)
- Inspect the undersides of leaves for pests and early disease signs.
- Remove yellowed or damaged leaves.
- Rotate the pot slightly if one side gets more sun.
- Check that drainage holes aren’t blocked.
- Look at flowering and fruit development, and harvest ripe chillies.
Every few weeks
- Top-dress with compost or feed according to product label directions once the plant is flowering.
- Check whether roots are coming out of the drainage holes, which means the plant may need a bigger pot.
Seasonally
- Adjust watering, shade and protection for heat, rain or cold.
Start with One Good Pot
Healthy chilli plants come down to a few basics working together: enough direct sunlight, a well-drained growing mix, sensible watering, balanced feeding and regular observation. Get those right and most problems never appear.
This week, pick one sunny spot, one pot with drainage holes about 30 cm wide, and a simple potting mix of soil, compost and cocopeat or sand. Plant a nursery seedling or sow a few seeds. Once your chilli is settled, the same routine of well-drained mix, steady watering and regular checking carries over to herbs too, and if you want a second pot for the kitchen, how to grow coriander at home is a good next read. Results will vary with your conditions, and some seasons will be better than others, but a small, careful start is the surest way to learn what your balcony or terrace can do.
Newsletter