
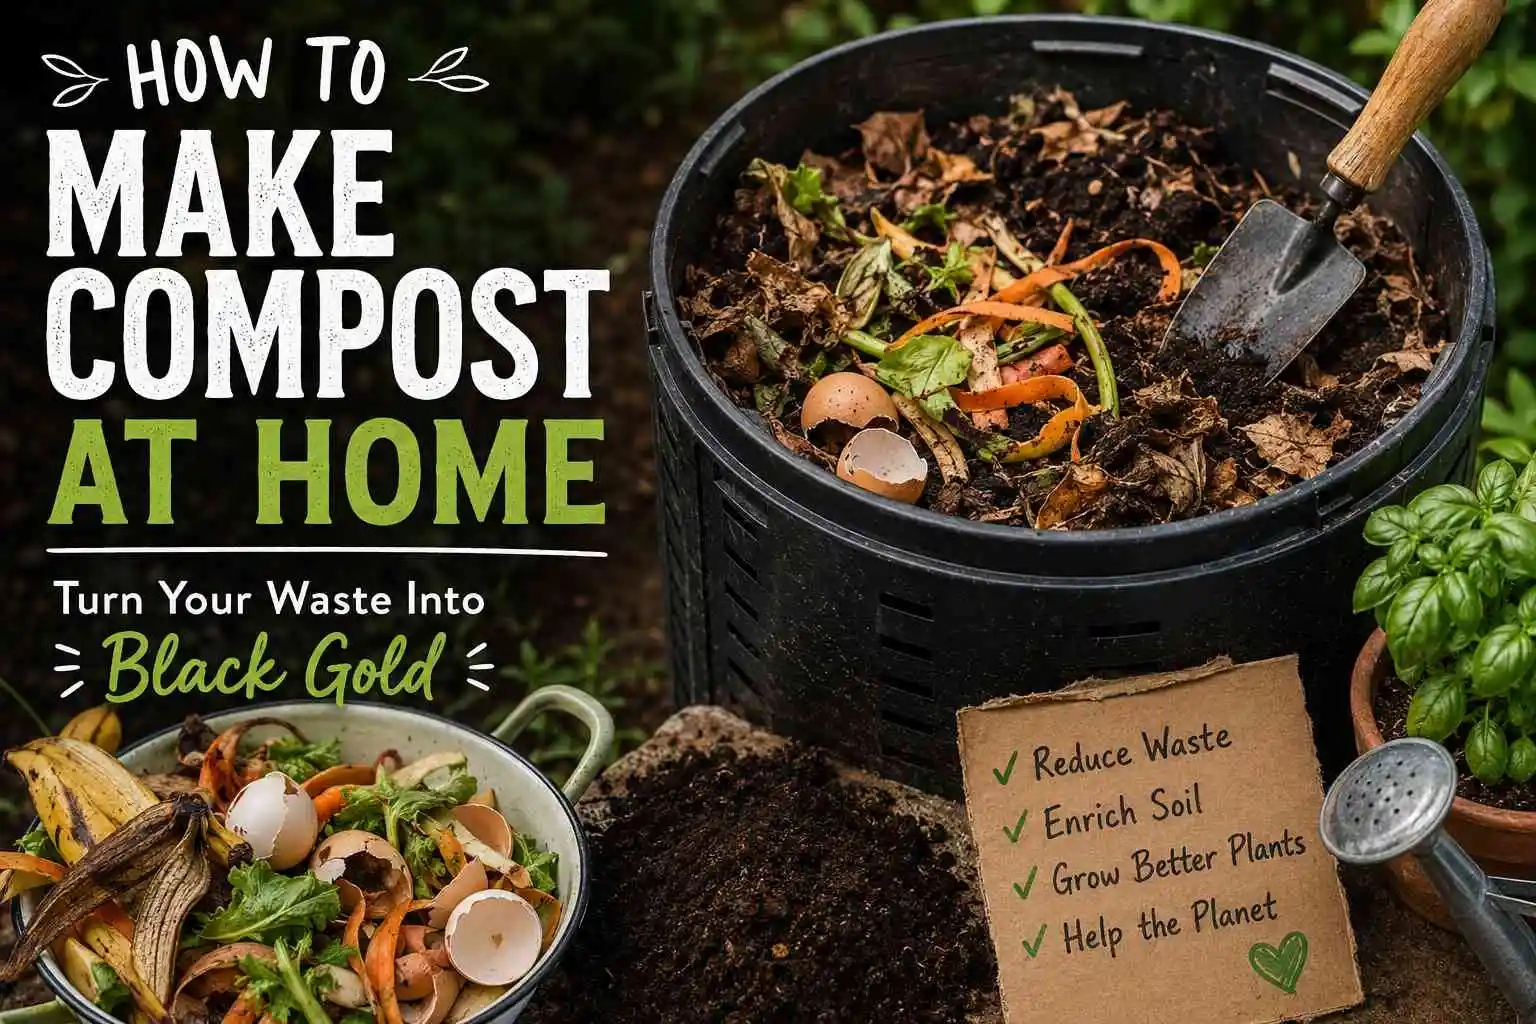
How to Make Compost at Home | Easiest Method
Let’s be honest. Most of us throw banana peels, coffee grounds, and vegetable scraps straight into the bin without a second thought. Then we drive to the garden center, spend fifteen dollars on a bag of compost, and wonder why our plants aren’t thriving.
Here’s the thing: you’re literally throwing gold in the trash.
Learning how to make compost at home is one of the most satisfying, low-effort things you can do for your garden — and for the planet. It doesn’t require a big backyard, expensive equipment, or a degree in horticulture. It just takes a little know-how and a willingness to let nature do most of the heavy lifting.

This guide walks you through everything from scratch. By the end, you’ll have a system that turns your kitchen and yard waste into rich, dark, crumbly compost that your plants will absolutely love.
What Is Compost, Exactly?
Compost is decomposed organic matter. Leaves, food scraps, grass clippings, cardboard — when these break down together under the right conditions, they transform into a dark, earthy material that improves soil structure, feeds soil microbes, retains moisture, and delivers a slow-release buffet of nutrients to plants.
It’s sometimes called “black gold” by gardeners, and once you see what it does to tired, compacted soil, you’ll understand why.
The process is driven by bacteria, fungi, worms, and other microorganisms that eat organic material and break it down. Your job is simply to give them what they need: a balanced diet, some moisture, and occasional airflow.
The Brown and Green Rule: The Foundation of Good Composting
Before you throw anything into a pile, you need to understand one key principle: the carbon-to-nitrogen ratio, commonly simplified as the browns-to-greens balance.
Brown materials are carbon-rich and provide structure and energy for decomposition:
- Dried leaves
- Cardboard and paper (torn up)
- Straw and hay
- Wood chips and sawdust
- Paper bags and newspaper
- Dry twigs and prunings
Green materials are nitrogen-rich and feed the microbes that drive the process:
- Fruit and vegetable scraps
- Coffee grounds and filters
- Fresh grass clippings
- Plant trimmings and weeds (without seeds)
- Eggshells (technically neutral but a great addition)
- Tea bags
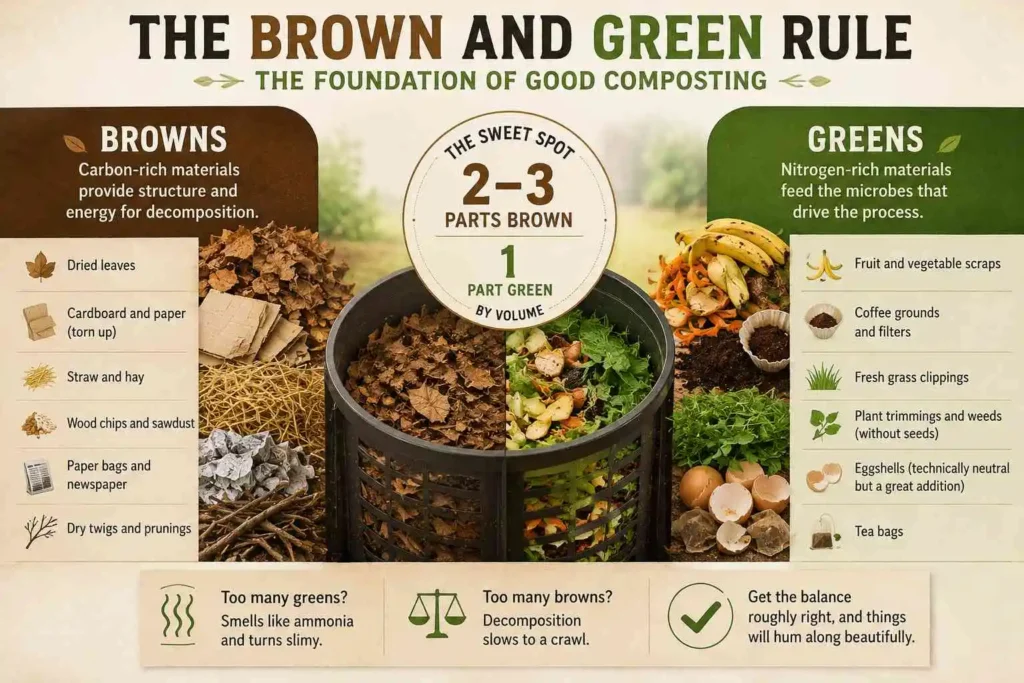
The sweet spot is roughly 2–3 parts brown to 1 part green by volume. Too many greens and your pile will smell like ammonia and turn slimy. Too many browns and decomposition slows to a crawl. Get the balance roughly right, and things will hum along beautifully.
What to Compost (and What to Leave Out)
Yes, add these:
- Fruit and vegetable peelings and scraps
- Coffee grounds and paper filters
- Tea leaves and bags (remove staples)
- Crushed eggshells
- Grass clippings and plant trimmings
- Fallen leaves
- Shredded newspaper and cardboard
- Wood ash (in small amounts)
- Hair and nail clippings (yes, really)
- Paper towels and unbleached paper bags
No, keep these out:
- Meat, fish, and bones (attracts pests and creates odor)
- Dairy products
- Oily or greasy food
- Dog or cat feces (can carry pathogens)
- Diseased plants (the disease can survive and spread)
- Weeds that have gone to seed
- Coal ash or treated wood
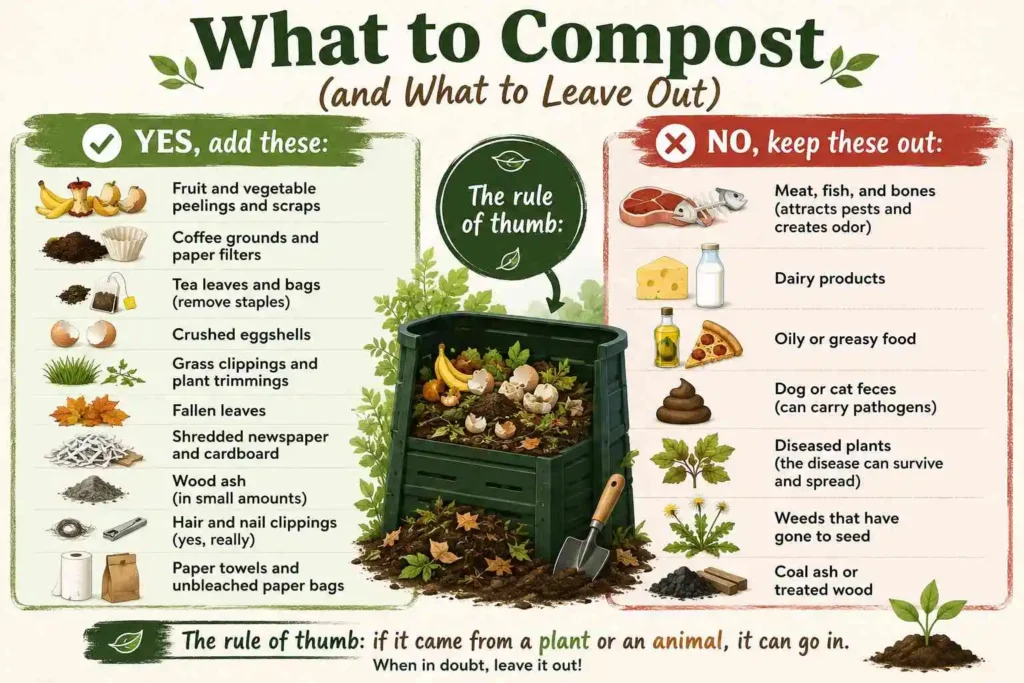
The rule of thumb: if it came from a plant or an animal that only ate plants, it’s probably fine. Anything that involves meat, fat, or pathogens is a hard no.
How to Make Compost at Home: Step by Step
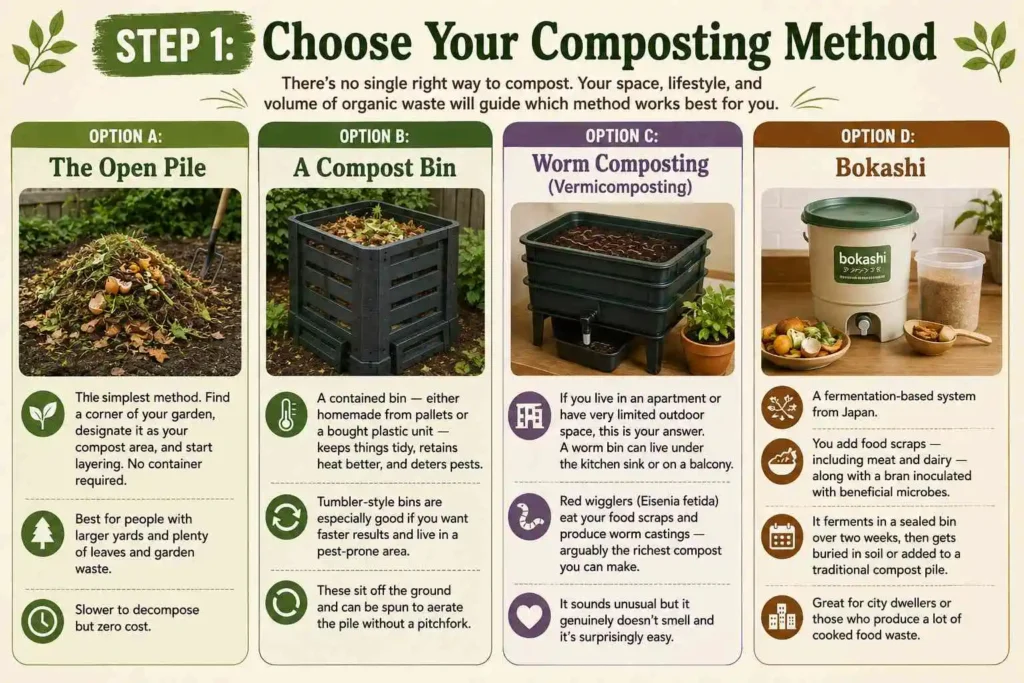
Step 1: Choose Your Composting Method
There’s no single right way to compost. Your space, lifestyle, and volume of organic waste will guide which method works best for you.
Option A: The Open Pile The simplest method. Find a corner of your garden, designate it as your compost area, and start layering. No container required. Best for people with larger yards and plenty of leaves and garden waste. Slower to decompose but zero cost.
Option B: A Compost Bin A contained bin — either homemade from pallets or a bought plastic unit — keeps things tidy, retains heat better, and deters pests. Tumbler-style bins are especially good if you want faster results and live in a pest-prone area. These sit off the ground and can be spun to aerate the pile without a pitchfork.
Option C: Worm Composting (Vermicomposting) If you live in an apartment or have very limited outdoor space, this is your answer. A worm bin can live under the kitchen sink or on a balcony. Red wigglers (Eisenia fetida) eat your food scraps and produce worm castings — arguably the richest compost you can make. It sounds unusual but it genuinely doesn’t smell and it’s surprisingly easy.
Option D: Bokashi A fermentation-based system from Japan. You add food scraps — including meat and dairy — along with a bran inoculated with beneficial microbes. It ferments in a sealed bin over two weeks, then gets buried in soil or added to a traditional compost pile. Great for city dwellers or those who produce a lot of cooked food waste.
Step 2: Set Up Your Pile or Bin
Pick a spot that’s:
- Accessible from the kitchen (you’ll thank yourself later)
- Partially shaded — too much direct sun dries it out
- On bare earth if possible, so worms can move in from below
If building a pile, start with a layer of coarse material like twigs or wood chips to aid drainage and airflow at the base.
Step 3: Start Layering
Think of your compost pile like a lasagna. Alternate layers of browns and greens:
- Base layer: 4–6 inches of browns (dried leaves, cardboard)
- Green layer: 2–3 inches of kitchen scraps or fresh grass clippings
- Thin brown layer: to cover the greens and reduce odor
- Repeat
Don’t stress about perfection. The layering is a rough guide, not a recipe. As long as you’re mixing browns and greens over time, you’ll be fine.
Step 4: Keep It Moist — But Not Wet
Your pile should feel like a wrung-out sponge. Moist enough that decomposition happens, dry enough that it doesn’t turn anaerobic and smelly.
In dry weather, water it lightly when you add new material. In very wet weather, cover it with a piece of cardboard or a lid to prevent it becoming waterlogged.
If your pile smells bad, it’s usually one of two things: too wet (add browns and turn it) or too many greens (add browns and turn it). Turning is almost always the answer.
Step 5: Turn It Regularly
Oxygen is essential. The microbes working through your pile are aerobic — they need air to function. Turning your pile introduces oxygen, redistributes moisture, and speeds up decomposition significantly.
For a hot, fast pile (compost ready in 4–8 weeks): turn it every 3–5 days. This keeps temperatures high enough to kill weed seeds and pathogens.
For a slow, cold pile (the more common approach): turn it every few weeks, or even monthly. Compost will be ready in 3–6 months. Less effort, slightly longer wait.
If you genuinely don’t want to turn it at all, that’s fine too. A static pile will still break down — it just takes longer, sometimes a year or more. Leave it alone, keep adding material, and harvest from the bottom when it looks ready.
Step 6: Know When It’s Ready
Finished compost looks, smells, and feels nothing like the stuff you put in. It should be:
- Dark brown to black
- Crumbly and loose, not slimy or chunky
- Smelling like fresh earth — that clean, forest-floor scent
- Unrecognizable from its original ingredients
If you can still see individual food scraps or leaves, it needs more time. Cover those bits back up and wait another few weeks.
Check Out Our Recommended Amazon Gardening Tools– https://amzn.to/4fCBjHz
Affiliate Disclosure: As an Amazon Associate, we earn from qualifying purchases.
Troubleshooting Common Composting Problems
My pile smells like rotten eggs. Too wet and too little oxygen. Turn it thoroughly and add dry browns like shredded cardboard or straw.
My pile smells like ammonia. Too many nitrogen-rich greens. Add more carbon-heavy browns and turn it.
Nothing seems to be happening. Usually means it’s too dry, too carbon-heavy, or the pieces are too large to decompose quickly. Add water, add greens, and chop or shred materials smaller before adding them.
I have pests. Burying food scraps under a layer of browns helps. Avoid adding meat or cooked food to open piles. A sealed bin or tumbler solves most pest problems immediately.
How to Use Your Finished Compost
Once your compost is ready, the fun begins. Use it to:
- Improve garden beds: Spread 2–3 inches over beds and work it into the top few inches of soil before planting
- Feed established plants: Use as a mulch around the base of plants, keeping it slightly away from stems
- Revive lawn: Spread a thin layer (top-dressing) over grass and water it in
- Boost potting mix: Mix one part compost with two or three parts potting soil for container plants
- Make compost tea: Steep compost in water for 24–48 hours and use the liquid as a foliar spray or soil drench
A Word on Patience
Composting is a relationship. You’re working with living systems — bacteria, fungi, worms — and they operate on their own timeline. Some piles cook fast; others are slower. Temperature, moisture, the mix of materials, and how often you turn it all play a role.
But here’s what never changes: given time and basic care, organic matter will break down. You genuinely cannot fail at composting. You can only slow it down or speed it up.
Start simple. A small bin in the kitchen, a pile in the corner of the garden. Add your scraps. Add some leaves. Turn it occasionally. Check on it. In a few months, you’ll have something remarkable — rich, living soil amendment that costs nothing, reduces your household waste, and makes everything you grow a little more alive.
That’s the quiet magic of learning how to make compost at home. It’s not a chore. It’s a habit that changes how you see what you throw away.
Start with what you have. A bin, a pile, even a bucket. The worms will do the rest.
Interested in learning more about agriculture and farming? Explore our other blogs covering livestock farming, poultry farming, and horticulture.
Frequently Asked Questions
Does compost smell bad?
No. Properly maintained compost should have an earthy smell. Bad odors usually indicate excess moisture or poor airflow.
Can I compost cooked food?
It is generally better to avoid cooked foods, especially oily or meat-based items.
Can compost attract insects?
Some insects are normal and help decomposition. However, avoiding meat and dairy reduces pest problems.
Is composting difficult?
Not at all. Once you understand the basics, composting becomes a simple routine.
Can I compost during winter?
Yes, although decomposition may slow down in colder temperatures.