



Chia Seed Farming: Grow This Crop as a Profitable Business
A five-year-old chia plant produces seeds smaller than a sesame seed, yet those tiny seeds have pulled in more curious farmers over the past decade than almost any other “new” crop on the market. Part of it is the price tag chia commands compared to traditional grains. Part of it is the low water and input requirement compared to crops like paddy or sugarcane. And part of it is simple curiosity — farmers hear that a plot of chia can be more profitable per acre than wheat, and they want to know if that’s actually true for their land.
It can be. But chia is not a “plant and forget” crop, and that’s exactly where most beginners get into trouble. The seeds are so small that sowing depth and early moisture management make or break the entire crop before most farmers even realize something has gone wrong. Harvesting has its own learning curve — cut too early and seed quality drops, cut too late and shattering wastes a chunk of your yield on the ground.
This guide walks through the practical decisions that separate a chia crop that pays off from one that quietly drains money: whether your soil and climate actually suit the crop, how much land makes sense to start with, how to sow and manage it properly, and where the real costs and returns show up. If you’re weighing whether chia farming could work for you, this is the conversation that should happen before you buy a single kilogram of seed.

Why Is Chia Seed Farming Suddenly on Every Farmer’s Radar?
Chia (Salvia hispanica) has moved from a niche health-food ingredient to a crop that agri-input dealers and contract buyers are actively promoting in several states. The pitch is simple: it’s a short-duration crop, it needs comparatively less water than many traditional rabi crops, and demand from the health-food and export market has been growing.
That said, demand and price can shift. Chia is still a relatively thin market compared to wheat or soybean, which means prices can swing more sharply if too many farmers plant it in the same season without buyers lined up. This matters because it changes how you should think about scale — more on that later.
Quick Summary: Chia is attractive because of low water need, short duration, and a price premium over staple grains — but it’s a thinner, less established market, so buyer confirmation matters more than it does for commodity crops.
Is Chia Actually Suitable for Your Land?
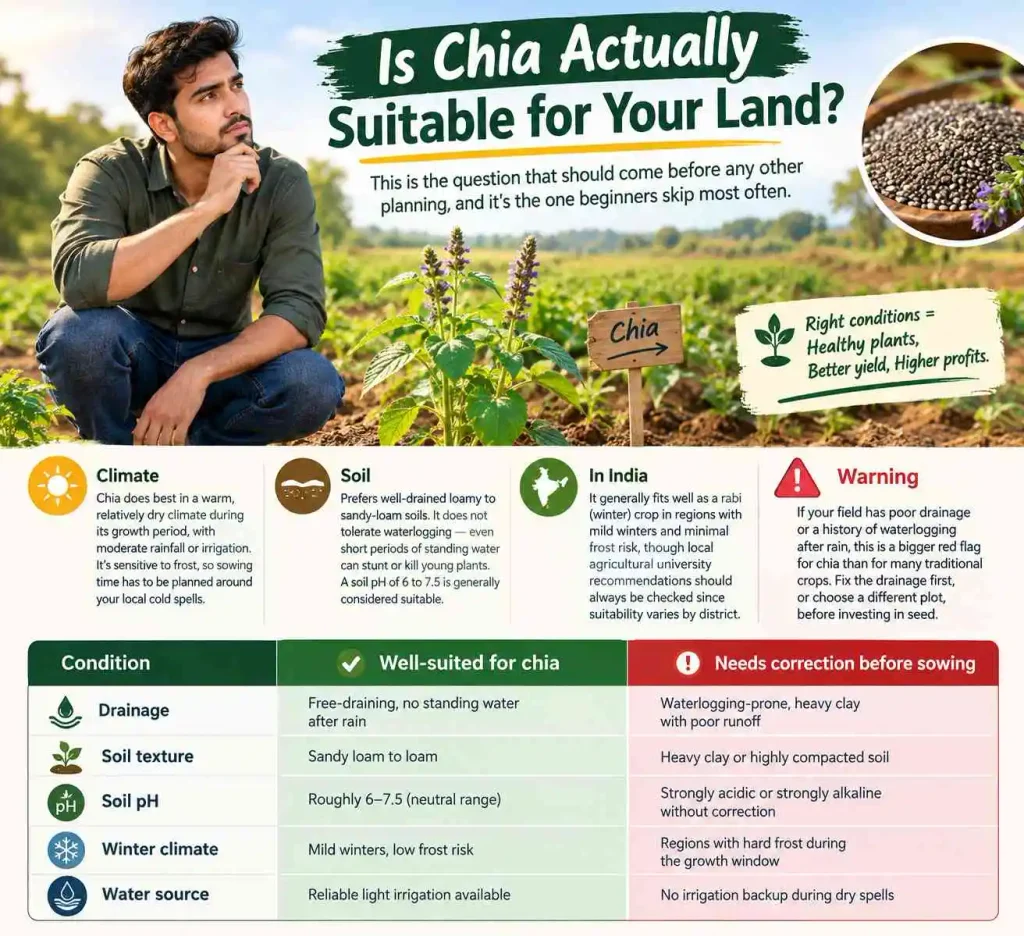
This is the question that should come before any other planning, and it’s the one beginners skip most often.
Chia does best in a warm, relatively dry climate during its growth period, with moderate rainfall or irrigation rather than heavy waterlogging-prone conditions. It’s sensitive to frost, so sowing time has to be planned around your local cold spells. In India, this generally means it fits well as a rabi (winter) crop in regions with mild winters and minimal frost risk, though local agricultural university recommendations should always be checked since suitability varies by district.
Soil-wise, chia prefers well-drained loamy to sandy-loam soils. It does not tolerate waterlogging — even short periods of standing water around the root zone can stunt or kill young plants. A soil pH in the roughly neutral range (around 6 to 7.5) is generally considered suitable, though chia has shown some tolerance for mildly acidic or alkaline soils in various growing regions.
Warning: If your field has poor drainage or a history of waterlogging after rain, this is a bigger red flag for chia than for many traditional crops. Fix the drainage first, or choose a different plot, before investing in seed.
Not every farm meets ideal conditions, and that’s fine — but it changes what precautions you need to take.
| Condition | Well-suited for chia | Needs correction before sowing |
|---|---|---|
| Drainage | Free-draining, no standing water after rain | Waterlogging-prone, heavy clay with poor runoff |
| Soil texture | Sandy loam to loam | Heavy clay or highly compacted soil |
| Soil pH | Roughly 6–7.5 (neutral range) | Strongly acidic or strongly alkaline without correction |
| Winter climate | Mild winters, low frost risk | Regions with hard frost during the growth window |
| Water source | Reliable light irrigation available | No irrigation backup during dry spells |
If your field falls in the “needs correction” column on more than one count, it’s worth improving those conditions on a small trial plot first rather than committing your full available land.
How Much Land Should a Beginner Actually Start With?
This is where enthusiasm and financial sense often pull in different directions. A new chia farmer who hasn’t handled the crop before is better served by a smaller trial plot — often somewhere in the range of half an acre to two acres — rather than jumping straight into ten or twenty acres.
The reasoning is straightforward: chia’s small seed size makes establishment tricky, harvesting timing is unforgiving, and buyer relationships take time to build. A mistake on two acres costs you a season’s input money. The same mistake on twenty acres can be a serious financial setback.
Common Mistake: Farmers sometimes plant a large area in their first season because seed and input costs per acre look manageable on paper. What they underestimate is the labour and attention needed during germination and harvesting — both of which are far more sensitive in chia than in wheat or gram.
For a beginner, the sensible approach looks like this:
- Start with a plot you can personally monitor every day during germination and harvest.
- Use that season to learn sowing depth, irrigation timing, weed pressure, and harvest signs specific to your soil.
- Identify at least one confirmed buyer or market channel before expanding.
- Scale up only after you’ve proven you can produce consistent, clean, food-grade seed.

Choosing Seed: Why This Decision Is Bigger Than It Looks
Seed quality in chia affects germination percentage, plant uniformity, and ultimately how evenly your crop matures — which directly affects harvest timing and losses. Because chia is still a relatively new commercial crop in many regions, the seed supply chain isn’t always as regulated as it is for wheat or rice.
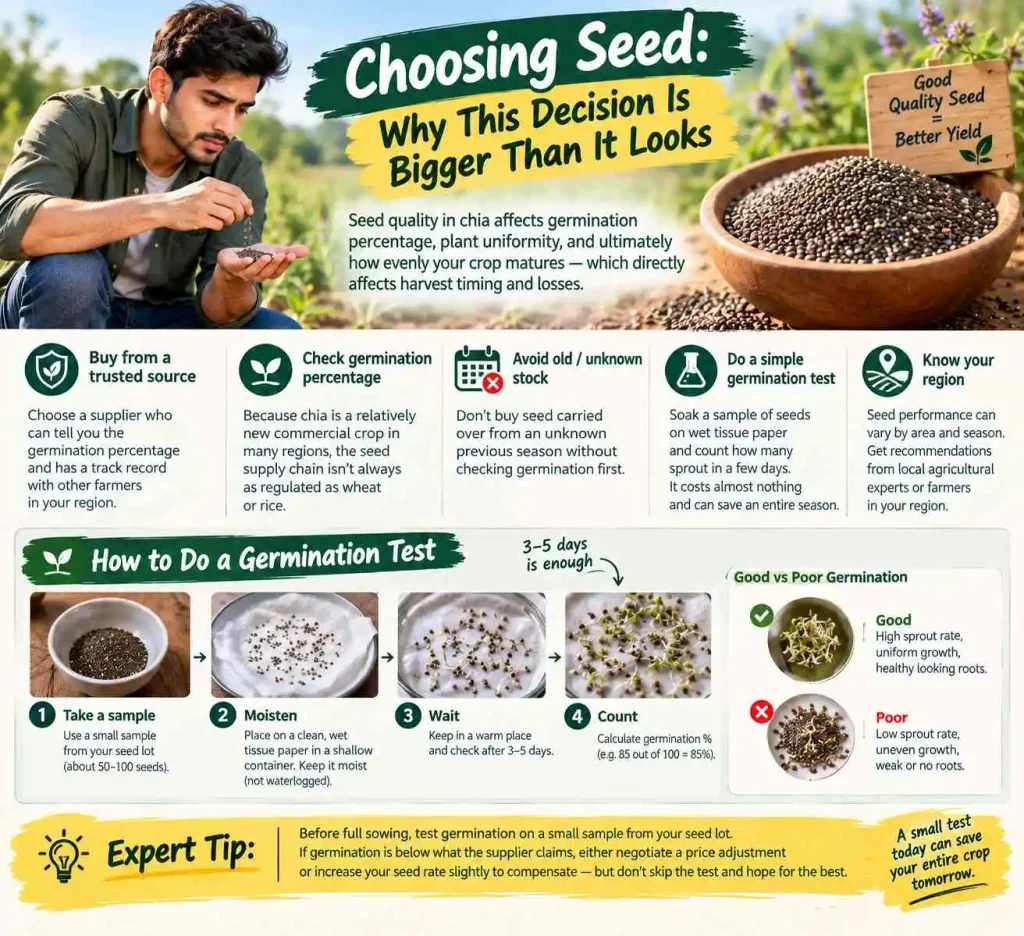
Buy seed from a source that can tell you the germination percentage and, ideally, has a track record with other farmers in your region. Avoid buying seed carried over from an unknown previous season without checking germination first — a simple germination test (soak a sample of seeds on wet tissue paper and count how many sprout in a few days) costs you almost nothing and can save an entire season.
Expert Tip: Before full sowing, test germination on a small sample from your seed lot. If germination is below what the supplier claims, either negotiate a price adjustment or increase your seed rate slightly to compensate — but don’t skip the test and hope for the best.
Why Sowing Time Can Make or Break Your Chia Crop
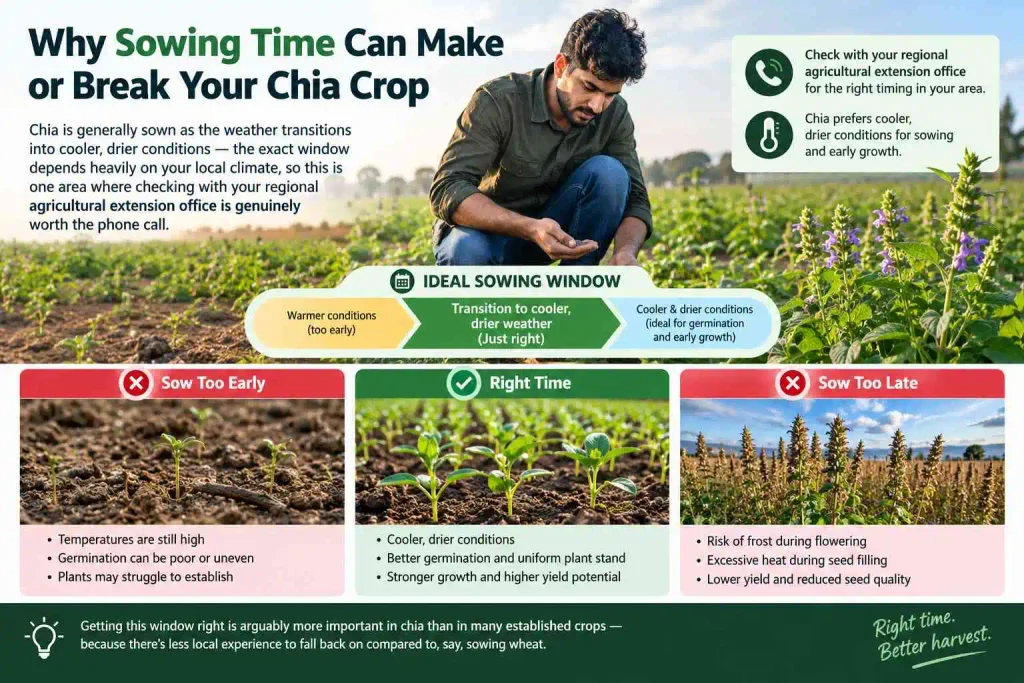
Chia is generally sown as the weather transitions into cooler, drier conditions — the exact window depends heavily on your local climate, so this is one area where checking with your regional agricultural extension office is genuinely worth the phone call.
Sow too early while temperatures are still high, and germination can be poor or uneven. Sow too late, and the crop may run into either frost during flowering or excessive heat during seed filling, both of which hurt yield and seed quality. Getting this window right is arguably more important in chia than in many established crops precisely because farmers have less collective local experience to fall back on.
This is where many new farmers struggle — not because the concept is complicated, but because there’s less local precedent to copy compared to, say, sowing wheat.
Getting the Seed Into the Ground: Rate, Spacing, and Depth
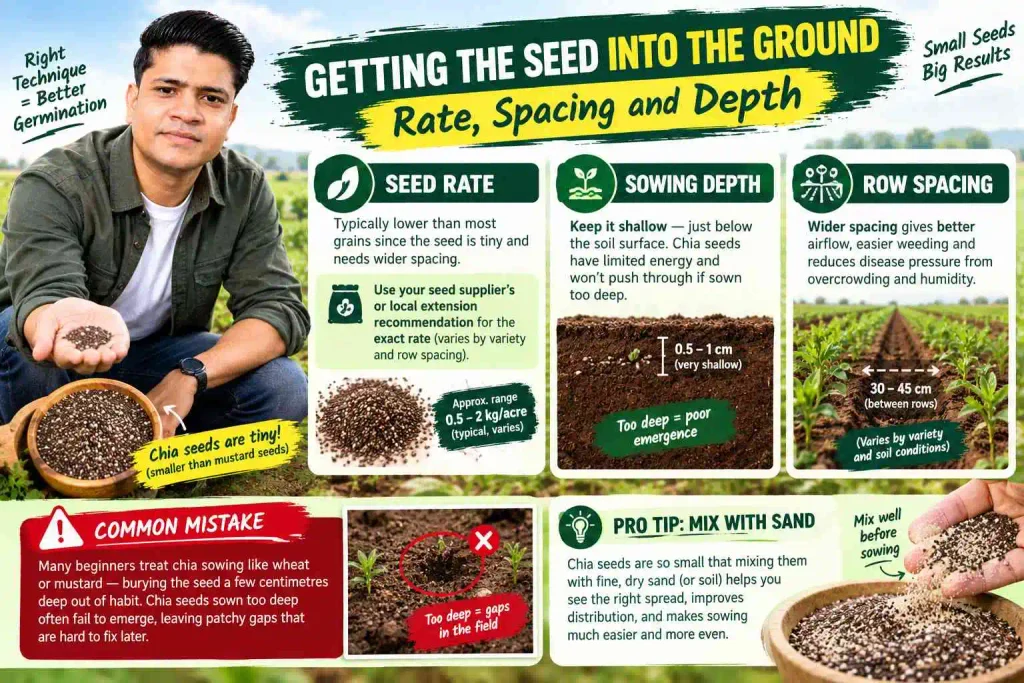
Chia seeds are tiny — noticeably smaller than mustard seeds — and this single fact drives most of the practical advice around sowing.
Seed rate: Typical recommendations for chia fall in a comparatively low range per acre, since the seed is so small and needs relatively wide spacing to avoid overcrowding. Exact rates vary by variety and row spacing, so use your seed supplier’s or local extension recommendation rather than assuming a fixed number applies everywhere.
Sowing depth: This is the single most common cause of poor establishment. Chia should be sown shallow — just below the soil surface, sometimes described as barely covered — because seeds sown too deep simply don’t have the energy reserves to push through to the surface.
Row spacing: Wider spacing (compared to a densely sown grain crop) allows better airflow, easier weeding, and reduces disease pressure from overcrowded, humid conditions at the base of the plants.
Common Mistake: Many beginners treat chia sowing the same way they’d sow wheat or mustard — burying seed a few centimetres deep out of habit. Chia seeds sown too deep frequently fail to emerge at all, leaving patchy gaps that are difficult to fix later in the season.
A simple way to improve establishment is mixing the tiny seed with dry sand or fine soil before broadcasting, which helps spread it more evenly and avoids clumping.
Why the First Week After Sowing Decides the Whole Season
Chia seeds are small, so the first few days after sowing matter more than almost any other stage of the crop. If the soil dries out before germination, the crop can emerge unevenly, leaving gaps that are difficult to correct later. If there’s too much water, the same tiny seeds can rot or wash away before they even sprout.
The practical takeaway: light, frequent irrigation right after sowing — enough to keep the top layer of soil consistently moist without pooling — gives the best shot at uniform germination. Once seedlings are established and rooted, irrigation can shift to a less frequent, deeper-watering schedule, since chia’s water requirement through the rest of its growth is comparatively modest and it doesn’t tolerate waterlogging at any stage.
Did You Know? One of the reasons chia is marketed as a “low water” crop is that its overall irrigation need through the season is modest compared to crops like paddy — but that reputation can be misleading if farmers assume it means the crop is forgiving during establishment. It’s the opposite: establishment is the most water-sensitive phase of the entire crop cycle.
Feeding the Crop Without Overdoing It
Chia doesn’t demand particularly heavy fertilization, and in fact, excessive nitrogen can push vegetative growth at the expense of flowering and seed set — meaning a lush, leafy field that doesn’t necessarily translate into a strong harvest.
A general approach is a moderate base application of farmyard manure or compost at land preparation, combined with a modest, split nitrogen dose — part at sowing and part during early vegetative growth — rather than one heavy dose upfront. Because chia is still an emerging crop in many regions, formal region-specific fertilizer recommendations may be limited, so a soil test before the season is genuinely useful to understand what your particular field is short on, rather than guessing.
Key Takeaway: Treat fertilizer as a tool to support balanced growth and seed development, not as a way to maximize plant height or leaf mass. More nitrogen is not automatically better in chia.
Why Early Weed Control Matters More Than Many Farmers Expect
Because chia seedlings are small and slow to establish canopy cover in the first few weeks, weeds can outcompete young plants for light, water, and nutrients before the farmer even notices a problem. Once weeds get ahead of the crop in this window, catching up is difficult.
Manual weeding or shallow inter-row cultivation during the first three to four weeks after emergence is generally the most reliable approach, since herbicide options specifically labelled for chia are limited in many regions. This is manual, labour-intensive work — factor it into your labour planning rather than treating it as an afterthought.
Practical Tip: Walk your field every few days during early growth. Catching a weed flush at the seedling stage, before it establishes a root system, takes a fraction of the labour needed to deal with mature weeds later.
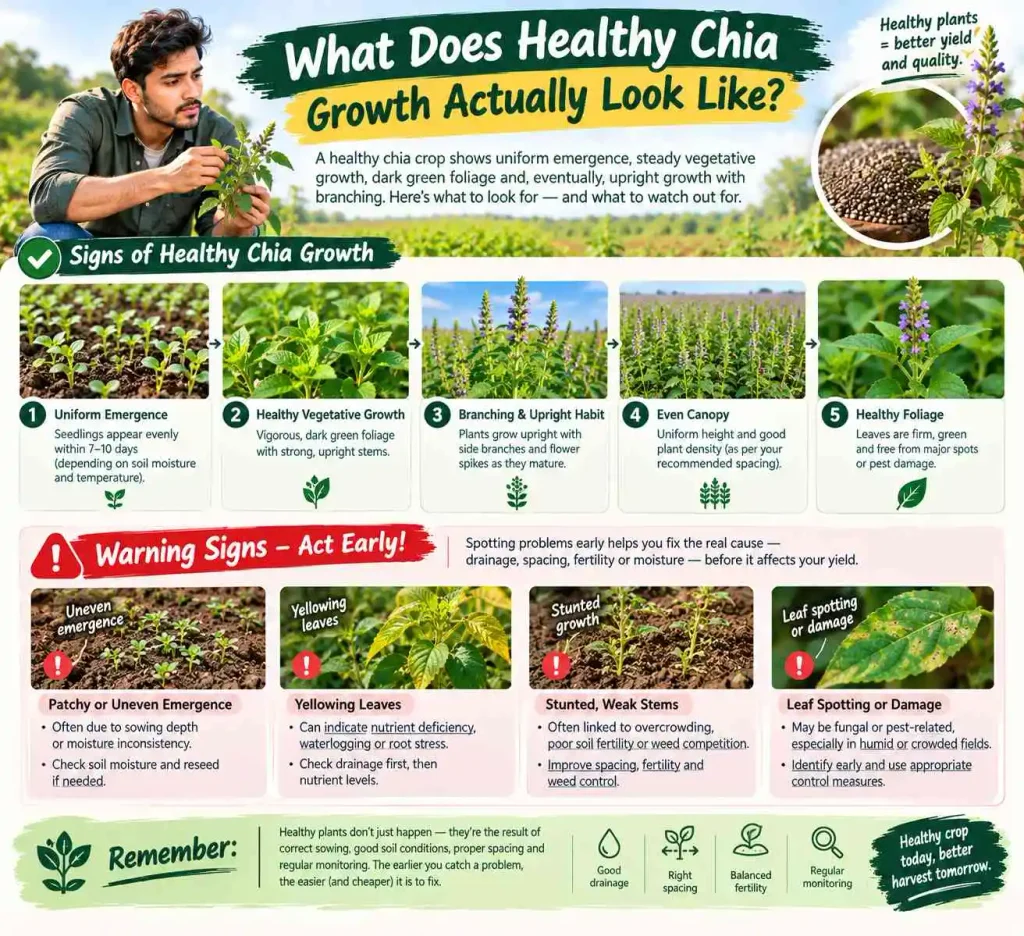
What Does Healthy Chia Growth Actually Look Like?
A healthy chia crop should show uniform seedling emergence within roughly a week or so of sowing (depending on soil moisture and temperature), followed by steady vegetative growth with reasonably dark green foliage and, eventually, upright growth habit with branching.
Warning signs worth acting on immediately include:
- Patchy or uneven emergence — usually points back to sowing depth or moisture inconsistency.
- Yellowing leaves — can indicate nutrient deficiency, waterlogging, or root stress; check drainage first.
- Stunted, weak stems — often linked to overcrowding, poor soil fertility, or early weed competition.
- Unusual leaf spotting or damage — worth identifying early, since fungal issues can spread quickly in humid, overcrowded conditions.
Catching these signs early and correcting the underlying cause — drainage, spacing, fertility, or moisture — is far more effective than waiting to see if the crop “grows out of it.”
Pests, Diseases, and Why Overcrowding Makes Everything Worse
Chia is generally considered to have fewer major pest and disease issues compared to many traditional crops, which is part of its appeal. That said, it isn’t immune. Fungal issues tend to show up in overcrowded, poorly drained, or overly humid conditions — which loops back to why spacing and drainage decisions made at sowing time continue to matter through the whole season.
Aphids and similar sap-sucking insects can appear, particularly during humid weather, and are usually manageable with timely monitoring rather than a routine spray schedule. The general principle: scout the field regularly, identify the actual pest or disease before treating, and avoid blanket spraying, which adds cost without necessarily solving the problem.
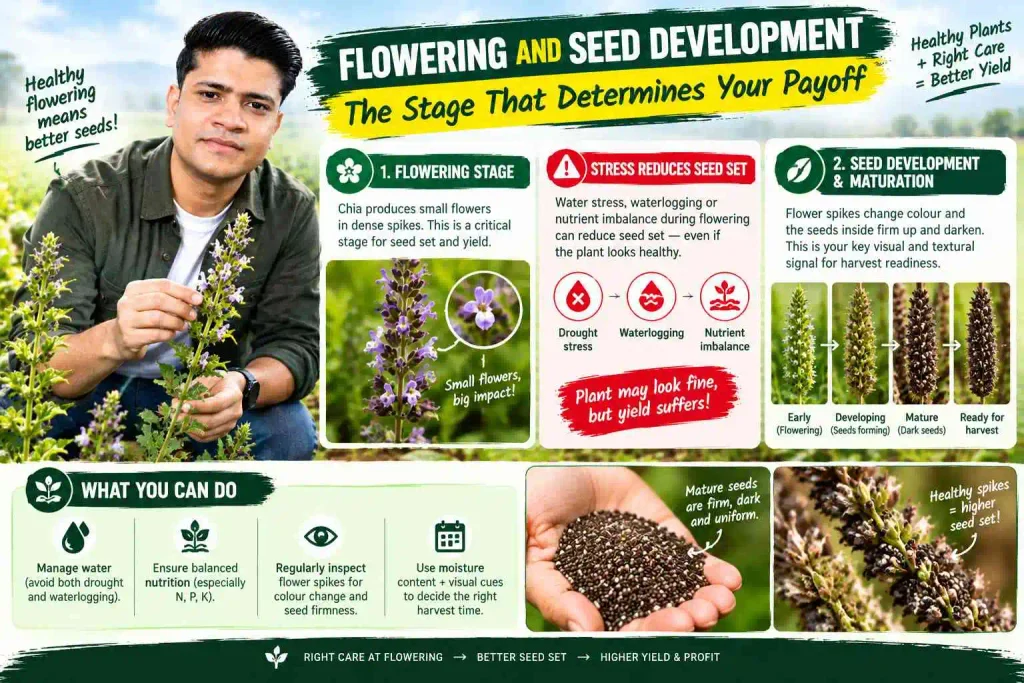
Flowering and Seed Development: The Stage That Determines Your Payoff
Chia produces small flowers in dense spikes, and this flowering period is when the crop’s water and nutrient management really pays off — or exposes earlier mistakes. Stress during flowering, whether from drought, waterlogging, or nutrient imbalance, tends to reduce seed set more than it affects plant survival, meaning the plant can look fine while quietly producing a poor harvest.
As seeds develop and mature, the flower spikes typically change colour and the seeds inside firm up and darken. This visual and textural change is one of the key signals farmers use, alongside moisture content, to judge harvest readiness.
When Should You Harvest Chia for Better Seed Quality?
Harvest timing in chia is a balancing act, and it’s one of the areas where beginners lose the most yield without realizing it.
Harvest too early, and seeds haven’t fully matured — moisture content is too high, oil and nutrient content may be lower, and the seed doesn’t store well. Harvest too late, and the mature seed heads shatter, dropping seed onto the ground before it ever reaches your storage bags — a loss that can quietly account for a meaningful share of total yield if timing is off by even a week or two in dry, windy conditions.
The general indicators farmers watch for are the flower spikes turning brown and dry, and the seeds inside firming up and darkening in colour, alongside declining seed moisture. Because these signals can vary with variety and local climate, checking a sample of seed heads by hand — rubbing them to see if seed releases easily — is a more reliable practical test than working off a fixed calendar date.
Warning: Don’t judge harvest readiness only by how the field looks from a distance. Walk in and check actual seed heads, because uneven maturity across the field is common, and a field that looks “mostly ready” can still have patches that will shatter if you wait for the last plants to finish.
Harvesting itself can be done by cutting and drying the seed heads before threshing (more practical for smaller plots) or, for larger commercial operations, using adapted combine harvesting equipment set up for a small-seeded crop — though this requires careful adjustment to avoid excessive seed loss or damage.
Drying, Cleaning, and Why Post-Harvest Handling Decides Your Final Price
Growing a good crop and then mishandling it after harvest is one of the most common ways farmers lose value in chia. Since the end product is a food-grade seed, moisture control and hygiene during drying and storage aren’t optional extras — they directly determine whether the buyer accepts your seed and at what grade.
After cutting, seed heads typically need to be dried further before threshing, either through sun-drying on clean tarps or mats (never directly on bare ground, which introduces dirt and contamination) or mechanical drying for larger volumes. Once threshed, the seed needs cleaning to remove chaff, dust, and foreign material — sieving and winnowing are common approaches for smaller operations.
Moisture content before storage matters enormously. Seed stored with too much residual moisture is at risk of mould growth, which can ruin an entire batch and, in a food product, creates a genuine safety concern — never sell or supply seed you suspect may be affected by mould or contamination.
Quick Summary: Dry seed heads on clean surfaces, thresh and clean thoroughly, confirm moisture is at a safe storage level, and store in clean, dry, pest-proof conditions. Each of these steps protects the value of everything you’ve already invested in growing the crop.
Storage, Packaging, and Food-Grade Considerations
Because chia is sold as a food product — often destined for human consumption directly or in packaged food products — hygiene standards matter more than they might for a crop headed straight to animal feed or industrial processing.
Store cleaned, properly dried seed in clean, moisture-proof, pest-proof containers or bags, in a cool, dry space away from direct contamination sources. If you’re planning to sell to a food-processing buyer or under a formal contract, ask early about their specific quality requirements — moisture limits, foreign matter tolerance, and any testing they require — since these can vary by buyer and are far easier to meet if you know them before harvest rather than after.
Depending on your scale and target market, food-safety registration or licensing may apply, particularly if you intend to process, package, or sell directly to consumers or retailers rather than supplying raw seed to an aggregator. Requirements here are location- and time-sensitive, so check current rules with your local food safety authority rather than relying on outdated information.
What Yield Can You Realistically Expect?
Chia yield varies considerably based on variety, soil fertility, climate, water management, and how well the crop was established and protected from losses at harvest. Rather than quoting a single number as if it applies everywhere, it’s more useful to understand the factors that push yield up or down:
| Factor | Effect on yield |
|---|---|
| Uniform, timely germination | Higher — even stand means consistent flowering and seed set |
| Waterlogging or drought stress during flowering | Lower — reduces seed set even if plants survive |
| Delayed or rushed harvest timing | Lower — either immature seed or shattering losses |
| Poor weed control early in the season | Lower — weeds compete for resources during establishment |
| Balanced, moderate fertility | Higher — supports seed development without excess vegetative growth |
| Good post-harvest handling | Doesn’t increase yield, but protects the yield you already have |
Rather than chasing a specific yield figure you’ve read online, track your own field’s performance over your first season or two — that number, adjusted for your actual conditions, is far more useful for planning your second season than any generic figure.
Where Does the Money Actually Go in a Chia Farm?
Profitability discussions around chia often skip straight to an eye-catching final number. A more useful approach is breaking down where costs actually occur, since that’s what a farmer can control.
| Cost category | What it covers |
|---|---|
| Land preparation | Ploughing, levelling, drainage correction if needed |
| Seed | Cost of seed plus any germination testing |
| Sowing | Labour and any seed-mixing material (sand/soil for even broadcasting) |
| Fertilizer | Farmyard manure/compost plus split nitrogen application |
| Irrigation | Water cost and labour for irrigation scheduling, especially during establishment |
| Weeding | Manual labour, typically the largest recurring labour cost |
| Pest/disease monitoring | Scouting time plus any targeted treatment if needed |
| Harvesting | Cutting, or combine adjustment/rental for larger plots |
| Drying and threshing | Labour, tarps/mats, or mechanical drying costs |
| Cleaning and packaging | Sieving, winnowing, storage containers or bags |
| Transport and marketing | Getting the product to the buyer, and time spent finding buyers |
Actual profitability depends on how these costs stack up against your yield, the price you secure, and how much you lose to establishment problems, pests, or post-harvest mishandling. A farmer who gets a strong price but loses a fifth of the harvest to poor drying practices ends up in a very different financial position than the raw price-per-kilogram might suggest.
Common Mistake: Farmers sometimes calculate expected profit using the best-case selling price they’ve heard about, without deducting realistic losses from establishment gaps, harvest shattering, or drying issues. Building a rough estimate of expected losses into your calculation from day one gives a far more honest picture.
Who Actually Buys Chia, and Why Lining This Up Early Matters
Because chia is a comparatively thin market compared to staple grains, having a buyer identified — ideally with at least an informal commitment — before you scale up production matters more here than it does for a commodity crop with well-established mandis and government procurement.
Potential buyers typically include health-food processors, seed aggregators or exporters, and in some cases, direct-to-consumer sales for smaller operations. Contract farming arrangements, where a company commits to purchasing your output at an agreed quality standard, can reduce market risk significantly for beginners — but read the quality and moisture requirements carefully before signing, since rejection at delivery due to unmet standards is a real risk if post-harvest handling wasn’t managed to spec.
Expert Tip: Before your first commercial-scale planting, spend time actually talking to two or three potential buyers about their quality requirements and current pricing expectations. This conversation is worth more than any yield estimate you’ll find online, because it tells you whether there’s a real, accessible market for what you’re about to grow.
Common Beginner Mistakes Worth Avoiding
A few patterns show up repeatedly among first-time chia growers:
- Sowing too deep — treating chia like a standard grain crop and burying the tiny seed beyond its emergence capacity.
- Underestimating early weed pressure — assuming weeding can wait, then losing the establishment window.
- Harvesting off a fixed calendar date rather than checking actual seed maturity, leading to either immature seed or shattering losses.
- Skipping post-harvest hygiene, treating drying and storage as an afterthought rather than the stage that protects everything already invested.
- Scaling up before securing a buyer, based on optimistic price assumptions rather than confirmed market access.
- Ignoring drainage issues in the chosen field, underestimating how sensitive chia is to waterlogging compared to more forgiving traditional crops.
Scaling Up: When Does It Actually Make Sense?
Once you’ve grown chia through at least one full season on a manageable plot — handled establishment, weed control, harvest timing, and post-harvest processing without major losses, and secured a reasonably confirmed buyer — expanding to a larger commercial area becomes a far more calculated decision rather than a gamble.
At that point, scaling usually means investing in better infrastructure: proper drying space, cleaning equipment suited to the larger volume, and possibly mechanized harvesting if your area and terrain support it. It also means formalizing buyer relationships, potentially through contracts that lock in both quality standards and pricing, since market volatility becomes a bigger risk as your production volume grows.
Before You Plant Your First Row
Chia farming rewards attention to detail far more than it rewards enthusiasm alone. The crop’s tiny seed size makes establishment unforgiving, its harvest window is narrow enough that a week’s delay can cost real yield, and its post-harvest handling directly determines whether your product meets food-grade standards or ends up downgraded.
None of this means chia is a difficult crop — plenty of farmers manage it well once they understand where the actual risk points are. But it does mean the sensible starting point isn’t your biggest available field. It’s a plot small enough to manage closely, where you can learn how your specific soil, climate, and labour setup handles sowing depth, early irrigation, weeding, and harvest timing — while you spend equal time lining up a buyer who actually wants what you’re about to grow.
Get that combination right on a small scale first, and the decision to expand becomes something you can justify with real numbers from your own field, not just a promising figure you read somewhere else. It’s the same logic that applies to any new farm enterprise: if you’re weighing a small-scale spirulina setup as another diversification option, start small there too, confirm your buyer and your process on a manageable scale, and let the numbers — not the pitch — tell you whether it’s worth scaling up.
Newsletter