



Button Mushroom Farming: Cost, Profit, Setup Guide (2026)
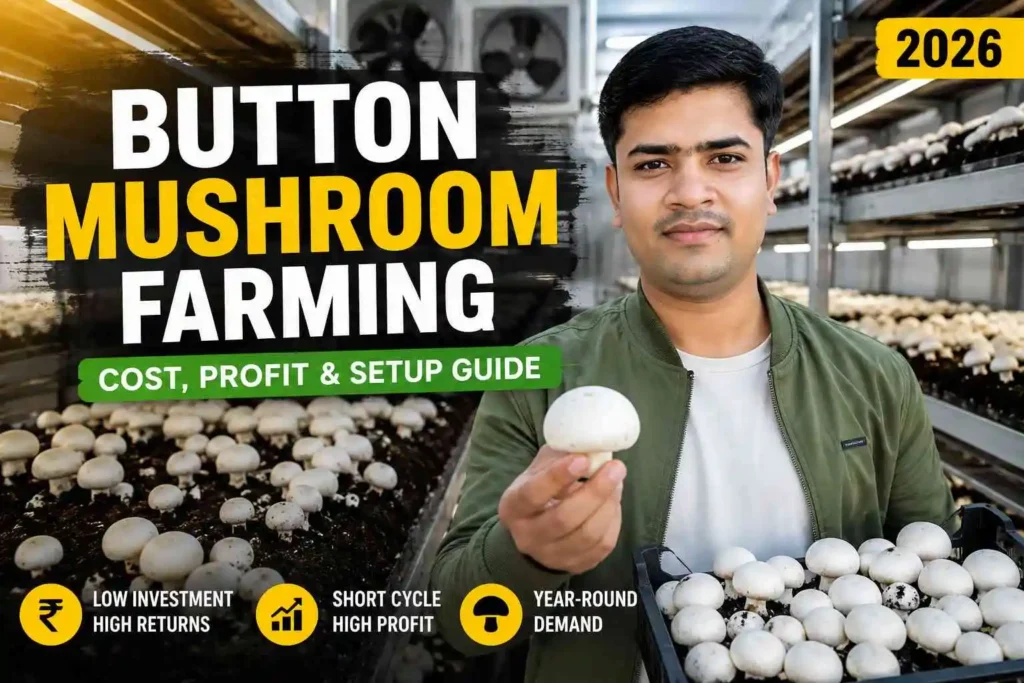
Walk into any wholesale vegetable market in Delhi, Pune, or Bengaluru early in the morning, and you’ll notice something interesting — button mushroom crates sell out faster than most leafy vegetables. Demand has been climbing steadily every year, driven by hotels, quick-service restaurants, health-conscious households, and a growing export market. And here’s the part that surprises most newcomers: you don’t need acres of land to tap into this demand. A room as small as 500 square feet, managed well, can generate a serious side income.
But there’s a catch. Button mushroom farming is not as forgiving as oyster mushroom cultivation. It demands tighter temperature control, precise compost preparation, and disciplined hygiene. Get these right, and you’re looking at one of the most profitable agribusinesses per square foot in Indian farming today. Get them wrong, and an entire crop can collapse within days.
This guide walks you through everything — climate requirements, farm setup, compost preparation, spawning, casing, temperature and humidity management, harvesting, marketing, realistic cost and profit figures in rupees, common mistakes, and the government subsidies available to you. By the end, you’ll know exactly what it takes to start and run a profitable button mushroom farming business in India.
Why Button Mushroom Farming Is Becoming a Profitable Agribusiness
Here’s why this matters right now: India’s mushroom consumption is rising roughly 10-12% every year, yet domestic production still struggles to meet demand in several states. That gap is exactly where new growers find opportunity.
Button mushrooms (Agaricus bisporus) fetch a noticeably higher price than oyster or milky mushrooms in most urban markets, largely because they’re used heavily in restaurants, pizza chains, and packaged food. A well-managed unit can complete a crop cycle in 8-10 weeks, meaning you get multiple harvest cycles a year from the same infrastructure.
Quick Summary: Button mushroom cultivation offers strong margins, short crop cycles, and year-round indoor production — but it rewards precision and punishes shortcuts.
The commercial appeal is real, but so is the learning curve. That’s exactly why the next section matters before you invest a single rupee.
Is Button Mushroom Farming Right for You?
Not every grower should jump straight into button mushrooms. This crop is technically demanding, and ignoring that reality is where most failures begin.
Ask yourself honestly:
- Can you monitor temperature and humidity multiple times a day, including early mornings?
- Do you have access to paddy straw, wheat straw, or agricultural waste for compost?
- Can you maintain strict hygiene discipline throughout the cycle?
- Are you prepared for an initial learning curve of 2-3 crop cycles before profits stabilize?
If you answered yes to most of these, you’re a strong candidate. If you’re looking for a low-maintenance side business, oyster mushroom farming might suit you better as a starting point before moving to button mushrooms.
Expert Tip: Many successful commercial growers start with a small 500-800 sq. ft. room first. It lets you learn compost timing and temperature control without risking a large investment.
Once you’ve decided this crop suits your commitment level, climate becomes your next critical decision point.
Climate Requirements That Decide Your Success
This is where many growers struggle before they even realise it. Button mushrooms are a temperate-climate crop, which means Indian weather works against you for a large part of the year unless you control it artificially.
Natural cultivation without cooling works best in North Indian plains during October to March, when night temperatures drop comfortably. Hill regions like Himachal Pradesh, parts of Uttarakhand, and the Nilgiris get a longer natural window. Everywhere else, you’ll need cooling infrastructure to grow year-round.
| Climate Factor | Requirement |
|---|---|
| Ideal outside season | October to March (plains) |
| Cropping temperature | 12°C to 18°C |
| Spawn run temperature | 22°C to 25°C |
| Relative humidity | 80% to 90% |
| Year-round production | Requires cooling/AC room |
Warning: Attempting button mushroom cultivation in peak summer without cooling almost always ends in crop failure. Don’t skip climate control to save on initial investment — it’s the single biggest cause of beginner losses.
Understanding the season is only half the picture. What really determines success is how temperature and humidity shift across the different stages of the crop — which we’ll cover next.
Ideal Temperature & Humidity Throughout the Growing Cycle
Button mushrooms don’t need one fixed temperature — they need different conditions at different stages, and mixing this up is a common reason crops underperform.
During spawn run, the mycelium needs warmth to spread through the compost quickly. Once casing is done and pinning begins, you actually need to drop the temperature to trigger fruiting. This shift confuses many first-time growers who assume warmer is always better.
| Growth Stage | Temperature | Humidity |
|---|---|---|
| Spawn Run | 22°C – 25°C | 85% – 90% |
| Casing Application | 20°C – 22°C | 85% – 90% |
| Pinning (Fruiting Trigger) | 16°C – 18°C | 85% – 90% |
| Cropping/Harvesting | 14°C – 16°C | 80% – 85% |
Best Practice: Use a simple wall-mounted digital thermo-hygrometer in every growing room and check it at least 3-4 times daily, especially during the pinning stage when temperature errors show up fastest.
Getting these numbers right on paper is one thing — building a room that can actually hold them is another challenge entirely.
Growing Room Design and Infrastructure
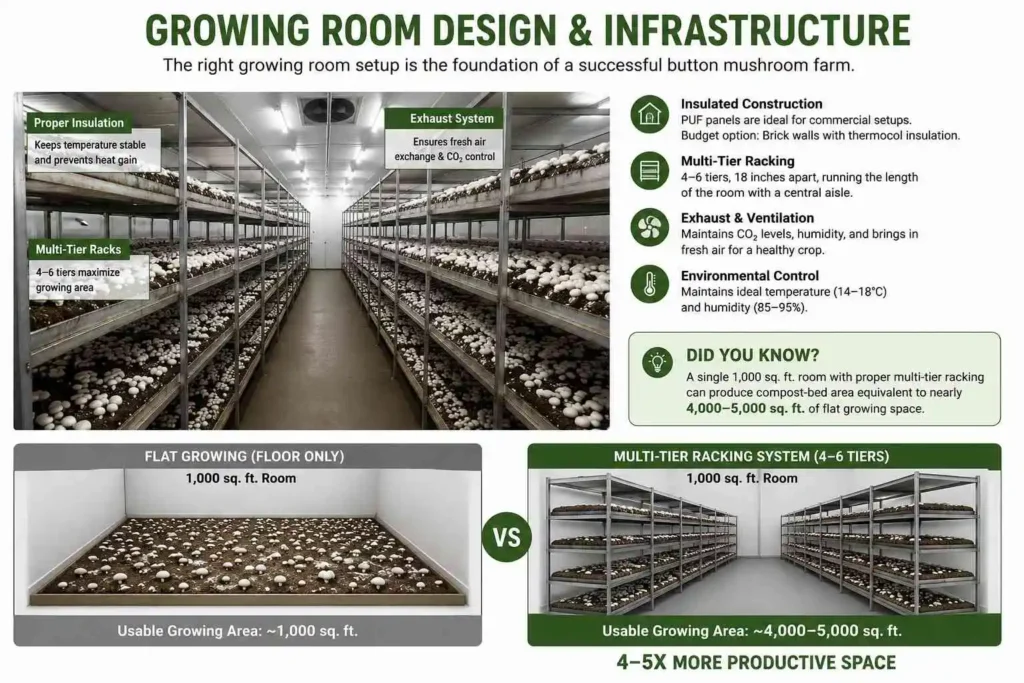
Your growing room is the foundation of the entire operation, and cutting corners here creates problems that follow you through every future crop cycle.
A good button mushroom room needs proper insulation to prevent heat gain, multi-tier racks to maximise growing area per square foot, and a reliable exhaust system for fresh air exchange. Insulated panel (PUF) construction works best for serious commercial setups, though budget growers often start with brick walls and thermocol insulation.
Racks are typically built in 4-6 tiers, each about 18 inches apart, running the length of the room with a central walking aisle. This design alone can multiply your usable growing area 4-5 times compared to floor-only cultivation.
Did You Know? A single 1,000 sq. ft. room with proper multi-tier racking can produce compost-bed area equivalent to nearly 4,000-5,000 sq. ft. of flat growing space.
Once your room is ready, the next question is what actually goes into the growing bed — and that starts with compost.
Compost Preparation: Phase I and Phase II
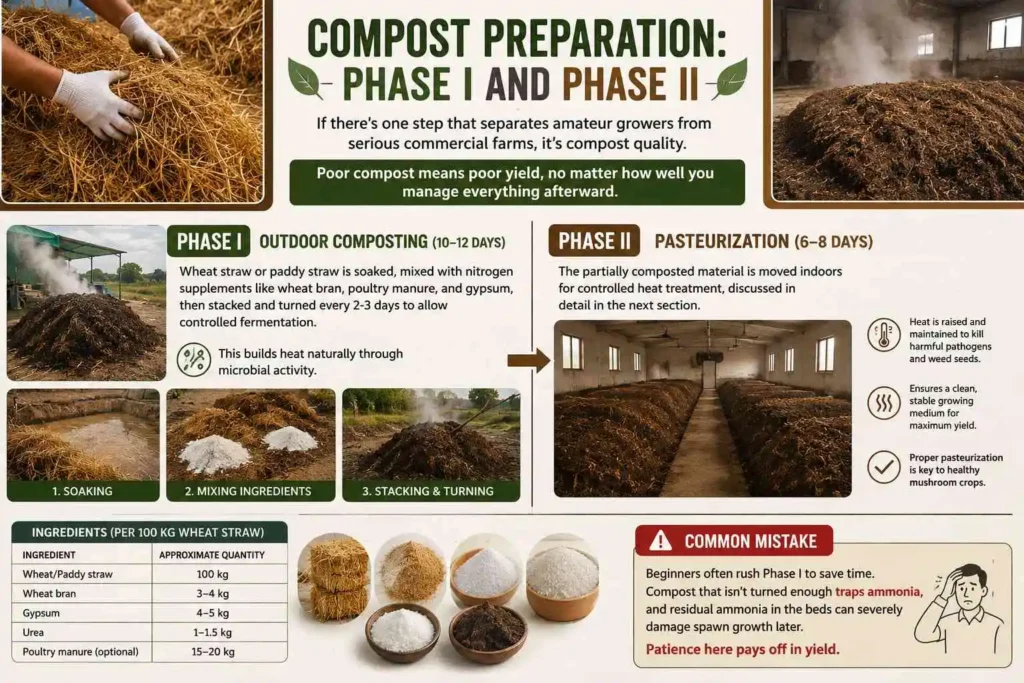
If there’s one step that separates amateur growers from serious commercial farms, it’s compost quality. Poor compost means poor yield, no matter how well you manage everything afterward.
Phase I (Outdoor Composting, 10-12 days): Wheat straw or paddy straw is soaked, mixed with nitrogen supplements like wheat bran, poultry manure, and gypsum, then stacked and turned every 2-3 days to allow controlled fermentation. This builds heat naturally through microbial activity.
Phase II (Pasteurization, 6-8 days): The partially composted material is moved indoors for controlled heat treatment, discussed in detail in the next section.
| Ingredient | Approximate Quantity (per 100 kg wheat straw) |
|---|---|
| Wheat/Paddy straw | 100 kg |
| Wheat bran | 3-4 kg |
| Gypsum | 4-5 kg |
| Urea | 1-1.5 kg |
| Poultry manure (optional) | 15-20 kg |
Common Mistake: Beginners often rush Phase I to save time. Compost that isn’t turned enough traps ammonia, and residual ammonia in the beds can severely damage spawn growth later. Patience here pays off in yield.
Once compost is properly built, it still isn’t safe for spawning — that requires one more critical step.
Pasteurization: Killing the Competition Before It Starts
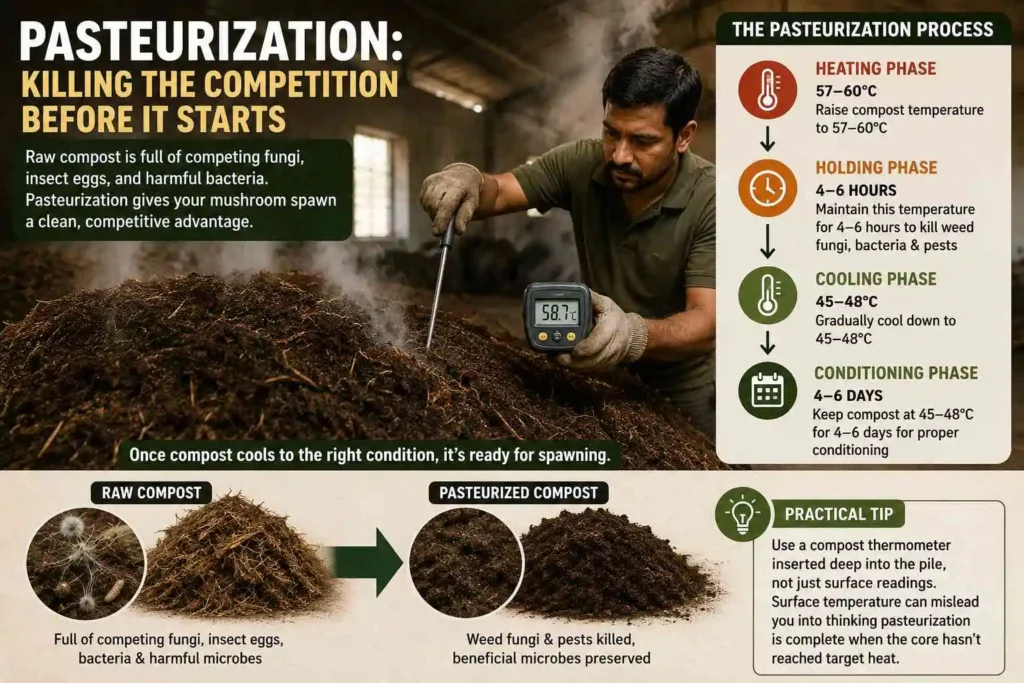
Here’s why this matters: raw compost is full of competing fungi, insect eggs, and harmful bacteria. Skip pasteurization, and your mushroom spawn will be fighting a losing battle from day one.
Pasteurization involves raising compost temperature to 57-60°C and holding it for 4-6 hours, then gradually cooling to 45-48°C for conditioning over 4-6 days. This kills weed fungi and pests while preserving beneficial microorganisms that help compost structure.
Practical Tip: Use a compost thermometer inserted deep into the pile, not just surface readings. Surface temperature can mislead you into thinking pasteurization is complete when the core hasn’t reached target heat.
Once compost cools to the right conditioning temperature, it’s finally ready for the ingredient that actually grows your mushrooms — spawn.
Choosing Quality Spawn: Don’t Compromise Here
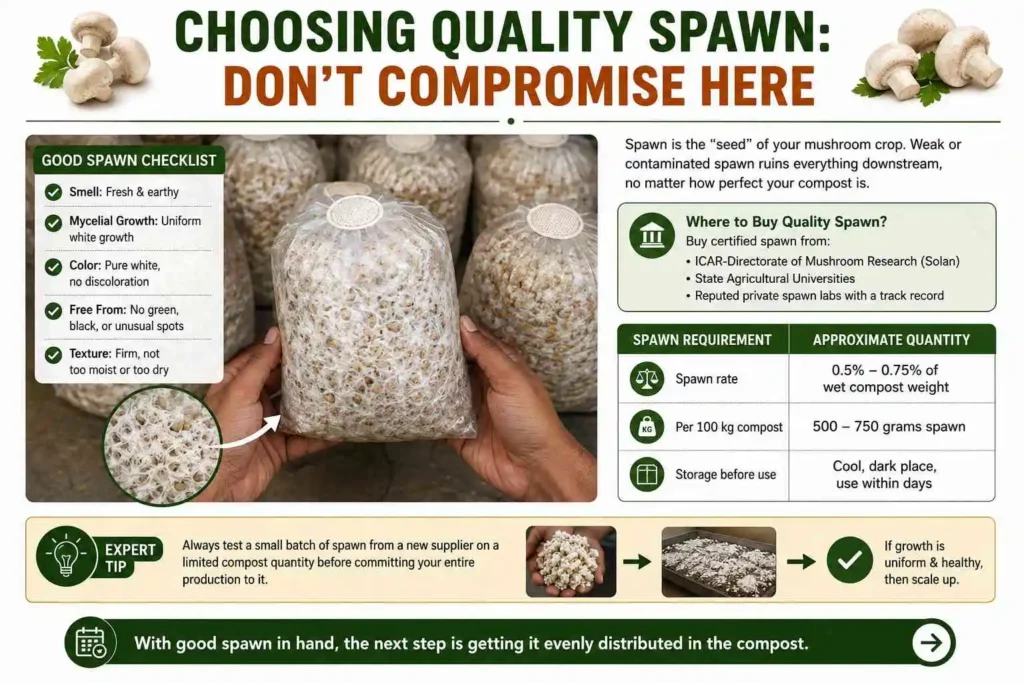
This is one area where saving money almost always costs you more later. Spawn is essentially the “seed” of your mushroom crop, and weak or contaminated spawn ruins everything downstream, no matter how perfect your compost is.
Buy certified spawn from ICAR-Directorate of Mushroom Research (Solan), state agricultural universities, or reputed private spawn labs with a track record. Good spawn should smell fresh and earthy, show uniform white mycelial growth, and have no green, black, or unusual discoloration.
| Spawn Requirement | Approximate Quantity |
|---|---|
| Spawn rate | 0.5% – 0.75% of wet compost weight |
| Per 100 kg compost | 500-750 grams spawn |
| Storage before use | Cool, dark place, use within days |
Expert Tip: Always test a small batch of spawn from a new supplier on a limited compost quantity before committing your entire production to it.
With good spawn in hand, the next step is getting it evenly distributed into the compost — a process called spawning.
Spawning Method: Getting the Mix Right
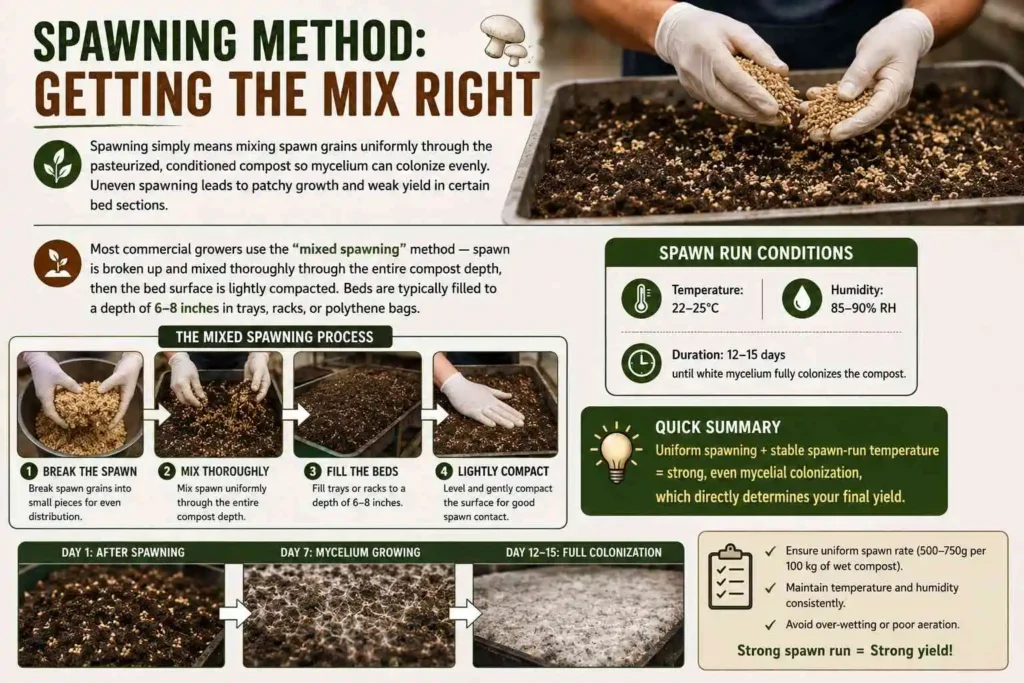
Spawning simply means mixing spawn grains uniformly through the pasteurized, conditioned compost so mycelium can colonize evenly. Uneven spawning leads to patchy growth and weak yield in certain bed sections.
Most commercial growers use the “mixed spawning” method — spawn is broken up and mixed thoroughly through the entire compost depth, then the bed surface is lightly compacted. Beds are typically filled to a depth of 6-8 inches in trays, racks, or polythene bags.
After spawning, rooms are held at 22-25°C with high humidity for 12-15 days until white mycelium fully colonizes the compost — this is the spawn run stage covered earlier.
Quick Summary: Uniform spawning + stable spawn-run temperature = strong, even mycelial colonization, which directly determines your final yield.
Once mycelium has fully run through the compost, it’s time to prepare the layer that will actually trigger mushroom formation — the casing soil.
Casing Soil Preparation
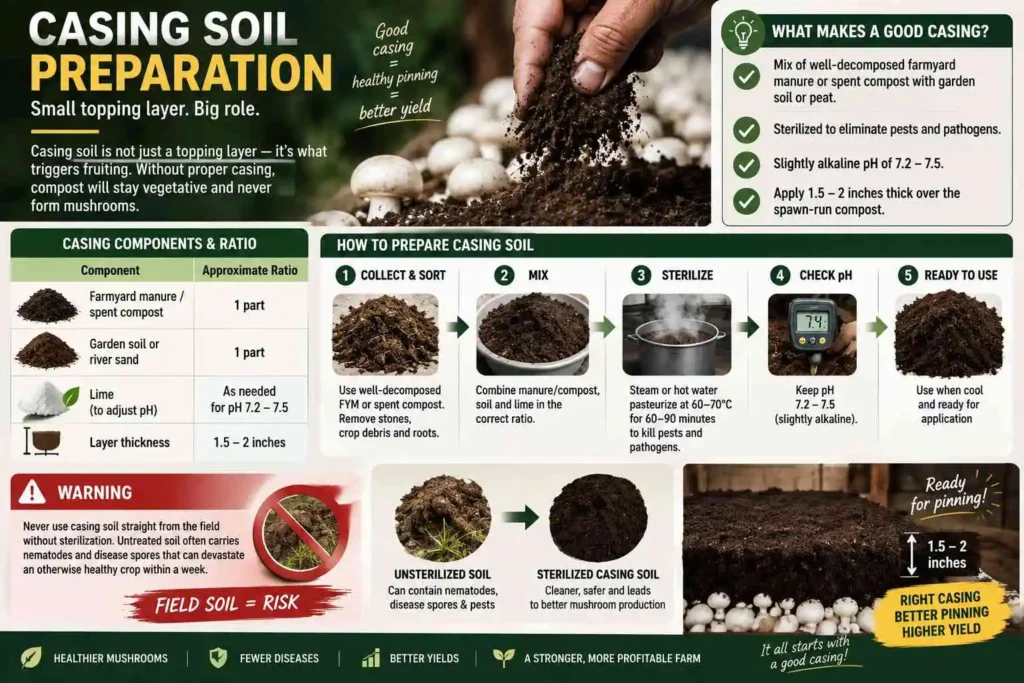
Many beginners underestimate casing soil, assuming it’s just a topping layer. In reality, it’s what triggers fruiting — without proper casing, compost will stay vegetative and never form mushrooms.
A good casing mix combines well-decomposed farmyard manure or spent compost with garden soil or peat, sterilized to eliminate pests and pathogens, and maintained at a slightly alkaline pH of 7.2-7.5. The casing layer is applied 1.5-2 inches thick over the spawn-run compost.
| Casing Component | Approximate Ratio |
|---|---|
| Farmyard manure/spent compost | 1 part |
| Garden soil or river sand | 1 part |
| Lime (to adjust pH) | As needed for pH 7.2-7.5 |
| Layer thickness | 1.5 – 2 inches |
Warning: Never use casing soil straight from the field without sterilization. Untreated soil often carries nematodes and disease spores that can devastate an otherwise healthy crop within a week.
With casing applied correctly, your role shifts from building the crop to actively managing it day by day.
Crop Management After Casing
This is the stage where daily discipline separates profitable growers from frustrated ones. After casing, rooms are kept at 20-22°C for about 4-5 days to let casing soil colonize with mycelium, then temperature is dropped to 16-18°C to trigger pinning.
During this pinning phase, fresh air exchange becomes critical, and light watering keeps the casing layer moist without waterlogging it. Pin heads typically appear within 5-8 days of the temperature drop, followed by the first flush of mushrooms roughly a week later.
Practical Tip: Avoid disturbing casing soil once pinning begins. Even light physical disturbance at this stage can abort developing pinheads.
Two management factors deserve their own detailed discussion here — watering and ventilation — since both are frequently mishandled by new growers.
Watering Schedule: Less Is Often More
One mistake many beginners make is overwatering, assuming more moisture means more mushrooms. It actually does the opposite — waterlogged casing soil suffocates developing pins and invites bacterial blotch disease.
Water should be applied as a fine mist, never a heavy stream, directly onto the casing surface rather than the compost below. During pinning and cropping, light watering once or twice daily is usually sufficient, adjusted based on how quickly the casing surface dries.
Best Practice: Check casing moisture by touch before every watering session. If the surface still feels moist, skip that watering round — consistency matters more than frequency.
Watering and airflow work together closely, which brings us to ventilation and one of the most overlooked factors in indoor mushroom farming.
Ventilation and CO₂ Management
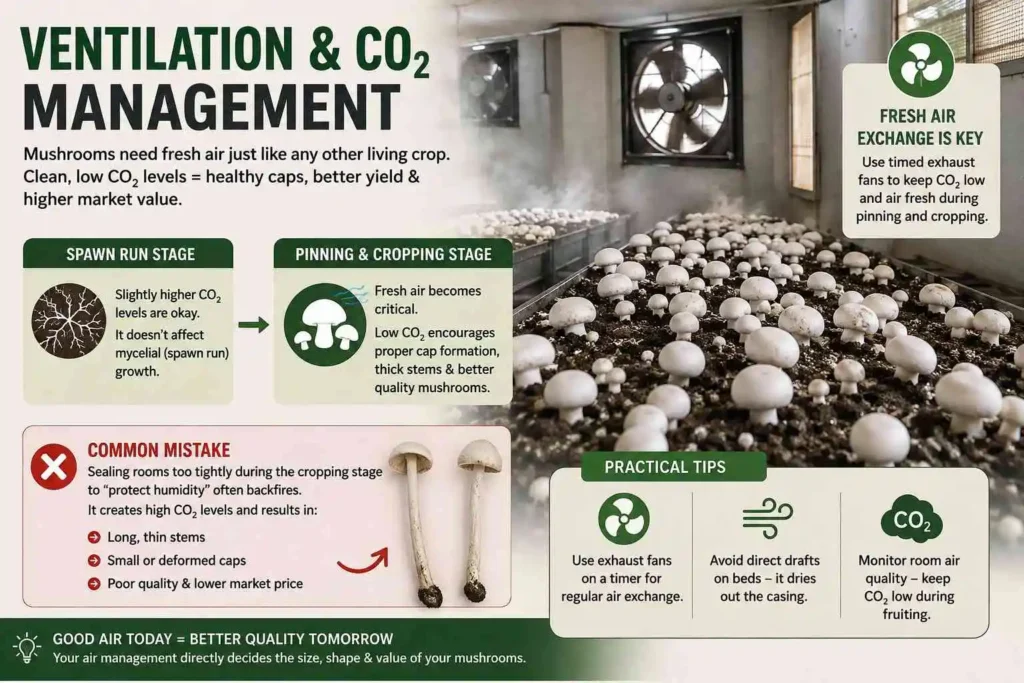
Here’s something many new growers don’t realize: mushrooms need fresh air just like any other living crop, and stale, CO₂-heavy air produces long, thin stems and poor-quality caps that fetch lower market prices.
During spawn run, slightly higher CO₂ levels are actually fine since they don’t affect vegetative mycelial growth. But once pinning begins, fresh air exchange must increase significantly to keep CO₂ levels low and encourage proper cap formation.
Maintain proper ventilation using timed exhaust fans, and always avoid direct drafts hitting the beds, which dry out the casing surface unevenly.
Common Mistake: Sealing rooms too tightly during the cropping stage to “protect humidity” often backfires, producing elongated, thin-stemmed mushrooms that buyers reject at the market.
Alongside air quality, one more environmental factor plays a quieter but real role in crop health — light.
Lighting Requirements
Button mushrooms don’t need light to grow, unlike green plants, but this doesn’t mean lighting is irrelevant to your operation. Diffused, low-intensity light helps workers monitor crop condition and pest activity during daily inspections.
Direct sunlight, however, should always be avoided, as it raises room temperature unpredictably and can dry out casing soil in patches near windows or open vents.
Practical Tip: A few low-wattage LED bulbs on a timer, used only during inspection and harvesting hours, are sufficient — there’s no benefit to keeping grow rooms lit continuously.
With environmental factors covered, it’s time to address the threat that worries every commercial grower most — pests and diseases.
The Diseases That Can Destroy an Entire Mushroom Crop—and How to Prevent Them
This is where hygiene discipline either protects your investment or destroys it within days. Button mushroom crops are vulnerable to several diseases and pests that spread fast in humid, enclosed growing rooms.
| Disease/Pest | Identification | Prevention |
|---|---|---|
| Dry Bubble | Distorted, grey mushroom caps | Sterilize casing soil, control humidity |
| Wet Bubble | Soft, watery mushroom masses | Strict hygiene, remove infected mushrooms immediately |
| Bacterial Blotch | Brown/yellow spots on caps | Avoid overwatering, reduce humidity slightly |
| Cobweb Mould | Grey cottony growth on beds | Isolate infected patches, improve ventilation |
| Mushroom Flies/Sciarid | Small flies around beds | Screen vents, use sticky traps |
Warning: Never touch healthy beds after handling an infected patch without washing hands and tools thoroughly. Cross-contamination through hands and equipment is one of the fastest ways disease spreads through an entire growing room.
Prevention, though, goes beyond just disease identification — it’s really about the overall system you build.
How to Prevent Crop Failure
Most crop failures trace back to a handful of repeated errors: poor compost quality, unsterilized casing soil, inconsistent temperature, and inadequate hygiene between crop cycles.
Maintain strict hygiene throughout the production cycle by disinfecting rooms, tools, and racks between every crop. Monitor room temperature and humidity several times a day rather than relying on a single morning check. Avoid overwatering after casing, and always buy certified spawn from reliable suppliers rather than unverified local sources.
Expert Tip: Keep a simple daily logbook of temperature, humidity, and watering for each room. Patterns that lead to problems are often visible in the data days before visible symptoms appear on the beds.
Once your crop management system is solid, the reward comes at harvest — but timing that harvest correctly matters more than most beginners realize.
Harvesting at the Right Stage
Harvest timing directly affects both shelf life and the price you’ll get at market, which makes this one of the most financially important steps in the entire process.
Harvest mushrooms before the caps fully open for better shelf life and market price — buttons with tightly closed caps and the veil still intact command premium rates, while open-cap mushrooms sell at a discount and spoil faster. Twist and pull gently rather than cutting, to avoid leaving stem stubs that rot and invite disease.
A typical crop gives 3-4 flushes over 6-8 weeks, with the first two flushes usually producing the highest yield.
Best Practice: Harvest early morning when mushrooms are firm and cool — this significantly extends post-harvest shelf life compared to midday harvesting.
Once mushrooms are picked, how you handle them in the next few hours determines whether you get full market value or losses from spoilage.
Post-Harvest Handling
This stage is often rushed, yet it directly affects your final selling price. Fresh button mushrooms are highly perishable and start losing quality within hours if handled carelessly.
Trim the base of the stem lightly, avoid washing mushrooms before storage (moisture accelerates spoilage), and sort by size and quality grade immediately after harvest. Handle mushrooms gently — bruised caps discolor quickly and fetch lower prices.
Practical Tip: Use shallow crates rather than deep sacks for collection. Stacking mushrooms too deep causes bruising from their own weight within hours.
Proper handling only helps if it’s followed by correct packaging and storage — the next link in getting mushrooms to market in good condition.
Packaging and Cold Storage
Here’s the reality: even perfectly grown mushrooms lose value fast without proper cold chain management, since button mushrooms typically stay fresh for only 2-3 days at room temperature.
Perforated punnets or polypropylene bags with ventilation holes work well for retail packaging, while bulk wholesale often uses crates lined with paper. Cold storage at 2-4°C can extend shelf life to nearly a week, which matters significantly if you’re supplying distant markets.
| Storage Method | Shelf Life |
|---|---|
| Room temperature | 1-2 days |
| Refrigerated (2-4°C) | 5-7 days |
| Vacuum/modified packaging | Up to 10 days |
Did You Know? Even a short 2-hour delay in cooling freshly harvested mushrooms can noticeably reduce shelf life compared to mushrooms cooled immediately after picking.
With your product properly packed and preserved, the final piece of the puzzle is figuring out where and how to actually sell it.
Marketing Options for Button Mushroom Farmers
Growing a great crop means nothing if you can’t sell it at a fair price, so marketing deserves as much planning as production.
- Wholesale mandis: Quick bulk sales but lower per-kg prices and heavy price fluctuation.
- Local vegetable markets/retail shops: Better margins than wholesale, but requires daily supply consistency.
- Hotels, restaurants, caterers: Stable bulk orders and good pricing, but demands reliable quality and timely delivery.
- Supermarkets/online grocery platforms: Higher visibility and pricing, but often require certifications and consistent volume commitments.
- Direct-to-consumer sales: Best margins, but limited scale unless you build a strong local customer base.
Expert Tip: Commercial growers usually diversify across 2-3 channels rather than depending on one buyer — it protects you from sudden price drops or order cancellations in any single channel.
Marketing decisions naturally lead to the question every new grower asks first: what will all this actually cost?
Button Mushroom Farming Cost in India
Costs vary significantly by location, farm size, material quality, and season, so treat the figures below as indicative market ranges — always get local quotations before investing.
| Cost Component | Approximate Range (₹) — 1,000 sq. ft. unit |
|---|---|
| Growing room construction/insulation | ₹3,00,000 – ₹6,00,000 |
| Racks (multi-tier) | ₹80,000 – ₹1,50,000 |
| Cooling equipment/AC units | ₹1,50,000 – ₹3,00,000 |
| Humidifier system | ₹40,000 – ₹80,000 |
| Exhaust fans and ventilation | ₹30,000 – ₹60,000 |
| Compost raw material (per cycle) | ₹15,000 – ₹25,000 |
| Spawn (per cycle) | ₹8,000 – ₹15,000 |
| Casing soil material (per cycle) | ₹5,000 – ₹10,000 |
| Labour (per cycle) | ₹20,000 – ₹35,000 |
| Electricity (per cycle) | ₹10,000 – ₹20,000 |
| Packaging material (per cycle) | ₹5,000 – ₹10,000 |
| Miscellaneous/contingency | ₹15,000 – ₹25,000 |
Warning: These figures are indicative market ranges only. Actual costs depend heavily on your city, current material prices, labour availability, and the scale you choose. Always collect at least 2-3 vendor quotations before finalizing your budget.
Once you know what you’re spending, the natural next question is what you can realistically expect to earn back.
Button Mushroom Farming Profit
Profitability depends on yield efficiency, market price, and how well you control production costs — but here’s a realistic indicative picture for a 1,000 sq. ft. unit.
| Profit Estimation (Per Cycle, 1,000 sq. ft.) | Approximate Value |
|---|---|
| Compost quantity used | 3,000 – 4,000 kg |
| Expected yield (12-15% of compost weight) | 400 – 600 kg |
| Average wholesale price | ₹80 – ₹120 per kg |
| Average retail/direct price | ₹120 – ₹180 per kg |
| Gross revenue (wholesale estimate) | ₹32,000 – ₹72,000 |
| Approximate operating cost per cycle | ₹65,000 – ₹1,00,000 (recurring only) |
Quick Summary: Early cycles often run close to breakeven while you’re learning; profitability typically improves significantly from the third or fourth cycle onward as yield consistency and market relationships strengthen. Scaling up unit size generally improves per-kg profitability due to better infrastructure utilization.
Profit potential improves further when you factor in government support available to mushroom growers — something many beginners overlook entirely.
Government Subsidies & Loans for Mushroom Farming
Here’s some good news for new growers: several central and state schemes offer real financial support for mushroom cultivation, and skipping this research means leaving money on the table.
The National Horticulture Board (NHB) and Ministry of Agriculture & Farmers Welfare periodically offer subsidy support for mushroom unit construction and spawn production units, while several state horticulture departments run their own mushroom development schemes with subsidies ranging roughly 25-50% depending on the state and category. ICAR-Directorate of Mushroom Research, Solan, also offers structured training programs that many banks accept as proof of technical competence for loan approval.
Practical Tip: Contact your district horticulture office directly rather than relying solely on online information — scheme details, subsidy percentages, and application windows change frequently and vary significantly by state.
Understanding available support is valuable, but avoiding common beginner errors is what actually protects your investment day to day.
Common Mistakes Beginners Make
Most losses in this business trace back to a small, repeatable set of errors rather than bad luck.
- Rushing compost preparation to save time, leading to poor structure and ammonia toxicity.
- Buying spawn from unverified sources purely because it’s cheaper.
- Ignoring temperature swings during the critical pinning stage.
- Overwatering casing soil “just to be safe.”
- Skipping hygiene protocols between crop cycles, allowing disease carryover.
- Underestimating cooling costs, especially for off-season production.
Warning: Even one of these mistakes, left uncorrected, can wipe out an entire cycle’s profit. Treat this list as your pre-crop checklist, not just background reading.
Avoiding mistakes protects your baseline — but a few targeted practices can meaningfully push your yields above average.
Expert Tips to Increase Yield
Small adjustments, applied consistently, often separate an average grower from a genuinely profitable one.
- Maintain proper ventilation to prevent long stems and poor-quality mushrooms.
- Keep a strict, logged temperature and humidity schedule rather than relying on memory.
- Test new spawn batches on a small scale before full commitment.
- Harvest at the correct maturity stage consistently, rather than delaying for slightly bigger caps.
- Rotate and disinfect racks thoroughly between cycles to reduce disease carryover.
Best Practice: Track yield data (kg per 100 kg compost) across every cycle. This single number tells you more about your operational efficiency than almost any other metric.
With all the technical, financial, and operational pieces on the table, the real question is whether this business genuinely deserves your time and capital.
Is Button Mushroom Farming Worth Starting?
Button mushroom farming rewards growers who treat it as a precise, disciplined agribusiness rather than a casual side project. The technical demands around temperature, compost, and hygiene are real, but they’re also entirely manageable with consistent attention and the right information.
Start with a manageable scale — a smaller room where you can master compost timing, temperature control, and casing before scaling up. Success in this business comes down to hygiene, climate control, and consistency far more than luck or market timing. Get your first two or three cycles right, build relationships with reliable spawn suppliers and buyers, and the path to a genuinely profitable mushroom farming business becomes clear.
Frequently Asked Questions
A commercial unit can start in as little as 500-1,000 sq. ft. with multi-tier racking, though larger units improve cost efficiency per kg produced.
From compost preparation to the final flush, a full cycle typically takes 10-12 weeks, including composting, spawn run, casing, and cropping.
Yes, but only during the natural cool season (roughly October to March in the plains). Year-round production requires cooling infrastructure.
Well-managed units typically achieve 12-15% yield of the compost weight used, though this varies with compost quality and crop management.
Yes, through NHB schemes, state horticulture departments, and ICAR-DMR training-linked support, though percentages and eligibility vary by state.
A basic 1,000 sq. ft. setup with cooling can range roughly between ₹5,00,000 and ₹10,00,000, depending on location and material quality — always get local quotations first.
Inconsistent temperature control during spawn run and pinning, combined with poor compost quality, accounts for most crop failures among beginners.
Newsletter